Handbuch: Rendern

From UVLayout Docs

Revision as of 00:25, 9 November 2007 by Headus (Talk | contribs)
Jump to: navigation, search
Titelseite
Über UVLayout
Laden/Speich./Update
Anzeige
Bearbeiten
Optimieren
Packen
Einrasten/Stapeln
Versch./Skal./Drehen
Rendern
Muster
Hotkeys
Schnellstart
Plugins
PDF herunterladen
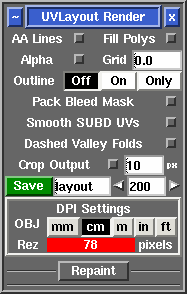
Open up the Render panel if you want to save out the current UV layout to a tiff image file. This file could then be used as a template for texture painting.
Save 
Click on Save to save the current UV layout into a tiff file with the specified base name; the default is layout.tif.
Name field 
Change this if you want a different base name to the tiff file created.
Resolution field 
Set the pixel resolution for the tiff file here.
AA Lines 
Tick this to smooth out the jaggies in the saved image, though this slows down the creation of the file quite a bit.
Fill Polys 
Tick this to include the flattened color coding in the image.

Once created, the image is displayed; you can then use File|Save or Ctrl-S to save it to a different location if you wish, using a ".tif" or ".jpg" filename extension to select the format of the saved image.