Handbuch: Rendern
From UVLayout Docs
(Difference between revisions)
| Revision as of 00:16, 9 November 2007 (edit) Headus (Talk | contribs) m (German User Guide: Render moved to Handbuch: Rendern) ← Previous diff |
Current revision (09:08, 4 December 2007) (edit) (undo) Sabine (Talk | contribs) |
||
| (One intermediate revision not shown.) | |||
| Line 1: | Line 1: | ||
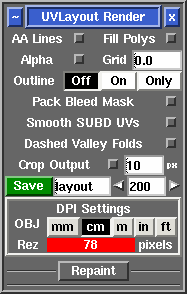
| - | {{:German User Guide: Menu}} [[Image:UserGuide-Render.png|right|]] Open up the '''Render''' panel if you want to save out the current UV layout to a tiff image file. This file could then be used as a template for texture painting. | + | {{:Handbuch: Menu}} [[Image:UserGuide-Render.png|right|]] Öffnen Sie das Menü '''Render''', um das aktuelle UV Layout als Bilddatei im TIFF-Format zu speichern. Diese Datei kann dann als Vorlage zur Texturerstellung verwendet werden. |
| - | ; Save : Click on '''Save''' to save the current UV layout into a tiff file with the specified base name; the default is ''layout.tif''. | + | ; Save : Klicken Sie auf '''Save''', um das aktuelle UV Layout als TIFF-Datei mit dem angegebenen Namen abzuspeichern, die Standardvorgabe ist ''layout.tif''. |
| - | ; Name field : Change this if you want a different base name to the tiff file created. | + | ; Namensfeld : Geben Sie hier einen anderen Text ein, wenn die TIFF-Datei einen anderen Namen bekommen soll. |
| - | ; Resolution field : Set the pixel resolution for the tiff file here. | + | ; Auflösungsfeld : Hier können Sie die Auflösung der TIFF-Datei in Pixel einstellen. |
| - | ; AA Lines : Tick this to smooth out the jaggies in the saved image, though this slows down the creation of the file quite a bit. | + | ; AA Lines : Aktivieren Sie diese Option, um die Linien in dem gespeicherten Bild zu glätten. Allerdings dauert der Speichervorgang der Datei dadurch deutlich länger. |
| - | ; Fill Polys : Tick this to include the flattened color coding in the image. | + | ; Fill Polys : Wenn Sie diese Option aktivieren, wird der Farbcode der Plättung in der Bilddatei mitgespeichert. |
| - | Once created, the image is displayed; you can then use '''File|Save''' or '''Ctrl-S''' to save it to a different location if you wish, using a ".tif" or ".jpg" filename extension to select the format of the saved image. | + | Sobald die Datei erstellt wurde, wird das Bild angezeigt; dann können Sie mit '''File|Save''' oder '''Strg-S''' die Datei an einem anderen Ort abspeichern. Geben Sie dabei die Datei-Endung ".tif" oder ".jpg" an, je nachdem, welches Dateiformat Sie wünschen. |
Current revision
|
Öffnen Sie das Menü Render, um das aktuelle UV Layout als Bilddatei im TIFF-Format zu speichern. Diese Datei kann dann als Vorlage zur Texturerstellung verwendet werden.
Sobald die Datei erstellt wurde, wird das Bild angezeigt; dann können Sie mit File|Save oder Strg-S die Datei an einem anderen Ort abspeichern. Geben Sie dabei die Datei-Endung ".tif" oder ".jpg" an, je nachdem, welches Dateiformat Sie wünschen. |
