User Guide: Move/Scale/Rotate
From UVLayout Docs
| Revision as of 02:06, 5 December 2023 (edit) Headus (Talk | contribs) ← Previous diff |
Revision as of 08:27, 5 November 2025 (edit) (undo) Headus (Talk | contribs) Next diff → |
||
| Line 3: | Line 3: | ||
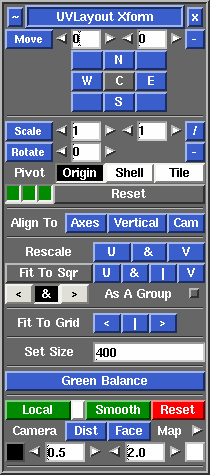
| Set the values you want to apply, then click on '''Move''', '''Scale''' or '''Rotate''' to transform all picked shells. Click the '''-''' or '''/''' buttons to do the inverse transform. If you want to apply the transforms to one or more boxes and their contents, pick the boxes by LMB clicking on one corner. If no shells are picked, all unlocked flattened shells are modified. | Set the values you want to apply, then click on '''Move''', '''Scale''' or '''Rotate''' to transform all picked shells. Click the '''-''' or '''/''' buttons to do the inverse transform. If you want to apply the transforms to one or more boxes and their contents, pick the boxes by LMB clicking on one corner. If no shells are picked, all unlocked flattened shells are modified. | ||
| - | If you want to quickly move shells around by tile units, click the '''N''', '''E''', '''S''', '''W''' or diagonal buttons to move them in that direction. Click the '''C''' button to center shells within a tile. | + | If you want to quickly move shells around by tile units, click the '''Tile''' button to show the compass, then click the '''N''', '''E''', '''S''', '''W''' or diagonal buttons to move them in that direction. Click the '''C''' button to center shells within a tile. |
| - | The '''Pivot''' options are '''Origin''' (rotate/scale around the world origin u=0, v=0), or '''Shell''' (rotate/scale about each shell's pivot point <sup>*</sup>), or '''Tile''' (rotate/scale about the center of the tile that each shell is currently in). | + | The '''Pivot''' options are: |
| - | <sup>*</sup> A shell's pivot point is the center of its bounding box by default, or the average location of any points that are pinned on that shell. So for example, if you want to rotate or scale about a specific point, use the '''P''' hotkey to pin just that one point on the shell. | + | :; Origin : Rotate/scale around the world origin u=0,v=0. |
| + | |||
| + | :; Tile : Rotate/scale about the center of the tile that each shell is currently in. | ||
| + | |||
| + | :; Shell : Rotate/scale about each shell's pivot point; this is the center of its bounding box by default. | ||
| + | |||
| + | :; Pts : Move/rotate/scale all picked points, not shells. | ||
| + | |||
| + | :; Mouse : If this is enabled, then when rotating or scaling with Space-LMB and Space-RMB, the pivot is the starting location of the mouse pointer. | ||
| + | |||
| + | :; Pinned : If this is enabled and there are any pinned points in the selection, the average of those is used at the pivot point. | ||
| Use the '''Reset''' button to reset the field values back to their defaults. | Use the '''Reset''' button to reset the field values back to their defaults. | ||
Revision as of 08:27, 5 November 2025
|
Open up the Move / Scale / Rotate panel if you want to apply a global numeric translate, scale or rotate to one or more shells.
Set the values you want to apply, then click on Move, Scale or Rotate to transform all picked shells. Click the - or / buttons to do the inverse transform. If you want to apply the transforms to one or more boxes and their contents, pick the boxes by LMB clicking on one corner. If no shells are picked, all unlocked flattened shells are modified. If you want to quickly move shells around by tile units, click the Tile button to show the compass, then click the N, E, S, W or diagonal buttons to move them in that direction. Click the C button to center shells within a tile. The Pivot options are:
Use the Reset button to reset the field values back to their defaults. The three green buttons to the bottom left represent the left, middle and right mouse buttons. By default these are all on, indicating that you can rotate (left), translate (middle) and scale (right) shells by holding down the Space key. Click on any one of the green buttons to turn that function off. For example, if you don't want to accidentally scale any shells, click the third button so it turns gray.
[Professional Version Only]
Local ScalingNormally UV shells in UVLayout are resized so that the texture scale is even across the entire surface; this is what the Rescale buttons above do. This means that when the checker texture is applied, all squares appear as close to the same size as possible. Sometimes however you may want to assign increased or reduced scales to specific parts. Some examples would be increased scale of UVs in a creature's face and hands to get greater detail there, but reduced scale for the inside of the mouth where very little detail is required. In previous versions of UVLayout it was possible to do this to a degree by simply scaling shells up and down, but they were rescaled back to their original size if any further flattening/optimizing was performed. It was also quite difficult to get a smooth transition between mixed scales within a single shell. You you can now create and edit these mixed scale UVs using the following buttons.
|
