|
|
|
|
|
|
This section of the main UVLayout window contains all the buttons used to load and save files.
Load
The main way to load files into UVLayout is to drag'n'drop them onto the headus UVLayout desktop icon. Files in UVLayout's own UVL format can also be double clicked to open them up. And finally, if UVLayout is already running, you can use the Load button to load a new file.
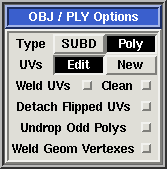
When loading OBJ or PLY files, there's a few options to choose between:
- SUBD / Poly
- If the mesh being loaded is the control cage for a subdivision surface, then make sure that SUBD is selected. The subdivided surface will then be used in the flattening calculations, rather than the control cage itself, producing more accurate results. If the mesh isn't a subdivision surface, then select Poly.
- Edit / New
- If your mesh already has UVs and you want to reflatten them to reduce distortion, select Edit. Otherwise, select New to delete any existing UVs and start with a clean slate.
- Weld UVs
- If the loaded mesh has seams (green edges) between adjacent polys, reload with this option ticked; it'll weld all co-incident UVs together.
- Clean
- If the loaded mesh has non-manifold edges (i.e. an edge is shared by more than two faces) then ticking this option will fix the problem geometry as its loaded. The clean will also remove duplicate faces. A summary of the changes made will be displayed once the file has been loaded. This option could break point correspondences between morph targets as the geometry is being modified.
- Detach Flipped UVs
- Tick this option if you want flipped polys in UV space to be detached into separate shells.
- Undrop Odd Polys
- Odd polys are ones that have collapsed UV coords; this is where two or more UV coordinates are welded together (imagine a quad in 3D space looking like a triangle in UV space). Selecting this option will split those odd polys away from the rest of the mesh and move them back into the Edit space, which then allows you to reflatten them to fix the problem.
- Weld Geom Vertexes
- If there are geometry seams (blue edges) between seemingly continuous surfaces, then reload with this ticked to weld those up. Currently this triangulates the mesh also, so its recommended you only do this if you really have to.
Import
Where Load will replace the existing mesh with the selected file, use Import to add another mesh into the current scene. This will allow you to copy or share UVs between the meshes, and also do things like pack shells across two or more meshes to share a single UV map.
After clicking Import and selecting the file, it will appear as a pink tinted mesh in the scene. You can move it around with Space-MMB, rotate with Space-LMB, and scale with Space-RMB.
Also a new row of buttons will appear in the main GUI window:
- Center
- To quickly move the imported mesh into position over the existing mesh, you can click the Center button and then move it to the side with Space-MMB.
- Rot
- If you need to rotate the imported mesh by exact amounts, enter the degrees into either the X (red axis), Y (green axis) or Z (blue axis) fields then click the Rot button. If it rotated the wrong way, click the - button a couple of times. You can also rotate the imported mesh by hand with Space-LMB.
- Scale
- The scale of the imported mesh is quite important; it will affect whether already flattened shells in the imported mesh need to be scaled up or down to match the texture density of the existing mesh. If you click the Area button, the imported mesh will be resized so its surface area is the same as the surface area of the existing mesh. This is usually a safe option if you aren't sure what to do here. If you click the BBox button, the imported mesh will be resized so its maximum bounding box dimension matches that of the existing mesh. You can also scale the imported mesh by hand with Space-RMB, or type a specific scale factor into the field and finish with <Enter> to make the change.
- Add
- When you are happy with the position and size of the imported mesh, click the Add button. The display window will close and re-open with the existing and imported meshes combined, and now you can copy UVs and pack shells etc.
- Cancel
- If you change your mind about importing the selected file, click the Cancel button and the pink tinted mesh will be discarded.
 | | Currently only OBJ files can be imported. If you want to import a PLY or UVL file, you will need to load those separately first and save them as OBJ before importing. You can run more than one UVLayout at once, so there's no need to close the currently loaded mesh if you ever need to do this. |
Save All
When saving your work, you have a choice between three file formats; UVL, PLY or OBJ:
- UVL
- UVLayout's own format that saves the current edit state, including which faces have been detached, dropped or flattened, and which edges have been 'C' tagged. You should use the UVL format if you're part way through flattening a mesh, and want to restart at a latter time.
- UVL is the default format, so for example, if you type "fish" into the Path field, the ".uvl" extension gets added automatically and the scene is saved into "fish.uvl".
- OBJ
- Use the OBJ format to export or import UVs to and from other applications.
- To save out an OBJ file, add ".obj" to the typed in filename.
- PLY
- PLY format files are more compact than OBJ files, but few applications know about them. They're included here mainly as a link between UVLayout and CySlice.
- To save out a PLY file, add ".ply" to the typed in filename.
Save Marked
To save out just part of the loaded mesh, first mark those polys with the G hotkey, then click the Save Marked button. If no polygons are marked, then any selected shells will be saved instead.
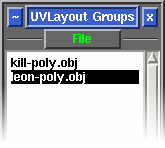
If you have imported one or more additional files, and only want to save out one of the loaded files, then you can quickly mark polys from the Groups: File list. Just LMB click on the filename in the list and all its polys will be marked.
Tmp/E Buttons
The Tmp 1 to 5 buttons can be used to quickly save the current scene into temporary files, named temp1.uvl to temp5.uvl, that can be loaded later on if something goes wrong.
The buttons are color coded:
| Red | - most recent save, can't be overwritten |
| Orange | - other saves |
| Greeny Orange | - oldest save |
| Green | - not yet used |
The E button also saves the current scene, but into files named edit01.uvl, edit02.uvl etc, always creating the next unused filename in the sequence.
You can also enable a regular auto save using the Auto Save setting under the Preferences panel.
To include the name of the original mesh into the quick save files, tick the Full Name Quick Saves preference.
Update - Older Versions
The Update button pops up a file selection window where you can select a previously loaded OBJ file that you want to update with the current UVs. The original file isn't overwritten though; a new file called whatever-uvlayout.obj is created, which is a copy of the original file with all the material/grouping information preserved and only the UVs changed.
Note: In the current release of UVLayout, this blending of the new UVs with the loaded OBJ file is automatic, so you only ever need to use the Save button. The Update button will be hidden away, and only appears when it might be needed, such as when you've loaded a UVL file that was saved out from an earlier version of UVLayout.
File Selection GUI
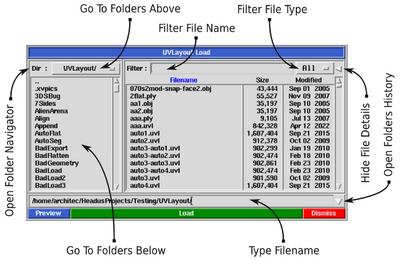
UVLayout's File Selection window is divided into four main areas; the directories list, the files list, the full path, and the action buttons (see diagram to the right). In the directories area, the sub-directories in the current directory are listed, along with "..", the current directory's parent. In the files area, the files in the current directory that match the filter are listed. In the path area the full path of the current directory, and selected file, is displayed. And finally, in the buttons area are the buttons you use to preview the selected file, to load/save the selected file, or abort from the load/save operation.
To change directory:
- Type the name in the File input field and tap <Enter>.
- Or single click on a listed directory name and tap <Enter>.
- Or double click on a listed directory name.
- Or tap <Backspace> to go up one level.
- Or double click on '..' (first entry in list) to go up one level.
- Or click on 'Dir:' option button to go up multiple levels.
- Or click the 'Dir:' button for the system directory navigator (Windows only).
- Or click the history arrow for previously accessed directories.
- Type '~' (tilde) in the File input field to go to your home directory.
- Type '.' by itself in the File input field to go back to the original directory.
- You can also use the Up and Down arrows, or PageUp, PageDown, Home and End keys to select directories.
- Tap <Esc> to close the file selection GUI.
To access the Desktop (Windows Only) and other filesystems:
- Use the 'Dir:' option button to select '/'.
- Or type '/' in the File input field and tap <Enter>.
To change the files listed:
- Use the option button to filter by file type.
- Edit the Filter input field and tap <Enter> to filter by file name. You can use '*', '?' and '[a-z]' wildcards.
To select a file:
- Type the name in the File input field and tap <Enter>.
- Or single click on file name in the files list and tap <Enter>
- Or double click on file name in the files list.
- You can also use the Up and Down arrows, or PageUp, PageDown, Home and End keys to select files.
The other buttons:
- Click Preview to quickly show the selected file (not always available).
- Click Dismiss to close the file selection GUI.
- Click on the 'Filename', 'Size' or 'Modified' labels to sort the files and directories lists by that value. Note: The "size" of a directory is the number of files contained within it.
|


