User Guide: Render

From UVLayout Docs

Jump to: navigation, search
Cover Page
About UVLayout
Load/Save
Display
Hotkeys
Edit
Optimize
Pack
Snap/Stack/Sort
Move/Scale/Rotate
Render
Pattern
Groups
Layers
Reshape
Segment
Quick Start
Interface Plugins
Download PDF
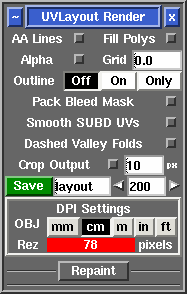
Open up the Render panel if you want to save out the current UV layout to a tiff image file. This file could then be used as a template for texture painting.
AA Lines 
Tick this to smooth out the jaggies in the saved image, though this slows down the creation of the file quite a bit.
Fill Polys 
Tick this to include the flattened color coding in the image.
Alpha 
Add an alpha channel to the output image, where all lines are solid, the background is clear, and filled polys are grey.
Grid 
Enter a value here to draw a grid behind the flattened geometry. This can be useful to register a printed or projected pattern to a measurement in the real world.
Outline 
Switch this to On to get a slightly thicker line around the shell boundaries, or to Only to show only the shell boundary edges.
Pack Bleed Mask 
Output a mask image for the pack bleed offsets.
Smooth SUBD UVs 
Ticking this option will render out the UVs according to Renderman's UV smoothing rules. Note: This currently only works for quads, and displays lines only (i.e. the quads aren't filled).
Dashed Valley Folds 
If you are using the flattened geometry as a pattern for folding real shapes, then ticking this option will indicate the valley folders with a dashed line.
Crop Output 
Tick this and the rendered images for each tile are cropped to the visible polygons, with the specified pixel border added. Alternatively, if you set the border to a value of "a", then the tile is cropped to a portrait A sized paper aspect ratio.
Save 
Click on Save to save the current UV layout into a tiff file with the specified base name; the default is layout.tif. Click Stop to abort the render before it completes.
Name field 
Change this if you want a different base name to the tiff file created.
Resolution field 
Set the pixel resolution for the tiff file here.
DPI Settings 
Ctrl-LMB click in the resolution field to enable and open up the DPI resolution settings. Select the unit of measure for the loaded geometry, and the Rez value displays how many pixels the rendered images will be. If unusually small or large, the value is highlighted in red to indicate that maybe the unit of measure is wrong or the DPI value is too high or low.

Once created, the image is displayed; you can then use File|Save or Ctrl-S to save it to a different location if you wish, using a ".tif" or ".jpg" filename extension to select the format of the saved image. If multiple images were rendered, use Space and Backspace to cycle between them.

[Professional Version Only]

Repaint

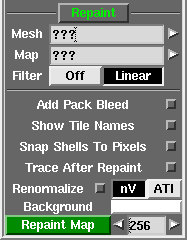
The Repaint tool allows you to load an old mesh and texture map into UVLayout where you can then modify the UVs (e.g. repack, optimize, modify seams) and then repaint the old map according to the new UVs. To use, the modified mesh with new UVs should be loaded into the 3D window.
Mesh 
Select the file (OBJ or UVL) with the original UVs.
Map 
Select the original texture map file.
Filter 
The filter to use when resampling pixels from the source map.
Add Pack Bleed 
After repainting, shell boundaries are bled out by the bleed value set in the Pack tool. This helps make the UV seams less visible when the repainted map is used as a texture.
Show Tile Names 
Tick this if you want to check that you have the tiled map naming parameters set properly before repainting. The decoded name for each tile will be previewed in the UV view of the graphics window.
Snap Shells To Pixels 
Tick this if you want to move the current shells so they're locked to the pixel locations; this is needed for lossless copying of shells that have been translated or rotated by 90 degree steps only. You should save your mesh out after running the repaint, because the UVs will have been modified slightly if you have ticked this option.
Trace After Repaint 
The newly repainted texture map is mapped onto the loaded mesh, just as if you'd used the Display Trace tool.
Renormalize 
If the map being repainted is a texture space normal map, tick this and the normals will be adjusted for shells that have been rotated. The nV option selects nVIDIA style normal maps, and use ATI for maps with an inverted G channel. Its safe to leave Renormalize on for standard color maps because UVLayout will only adjust the color values if it detects that a normal map is being processed.
Background 
LMB click the rectangle to select the color of the background in the repainted maps.
Repaint Map 
Set the output resolution, then click this to create the repainted map. Click Stop to abort the repainting before it completes.
The output can also be set to DPI values using the same method as describe above for the Render resolution.

Repainting Multiple Maps

If your mesh has multiple texture maps, such as color, specular and normal, then you can get UVLayout to process them in one go. Instead of selecting a texture map in the Map selector, you can load a CSV extension text file that has the names of the maps, one per line. For example ...

 fish-color.tif
 fish-spec.tif
 fish-norm.tif

By default UVLayout will create new files for each of the repainted maps with "-repaint" added to the original filename. If you would like a different output name, or to overwrite the original file, add that to the CSV file with a comma between the original and the new names ...

 fish-color.tif,new-color.tif    <- different output name
 fish-spec.tif,fish-spec.tif     <- overwrite original
 fish-norm.tif                   <- keep default output name

If these multiple maps are different resolutions, and you want the repainted maps to keep the same resolutions, then change the output resolution field to the equals character (i.e. =). You can also enter in a resolution multiplier (e.g. *2) or divider (e.g. /4), and then the resolutions of the output maps are adjusted accordingly.

Repainting Multiple Tiles

If your original UVs are spread across multiple UV tiles, with corresponding maps, then you can also repaint these to the new UVs. Instead of selecting one of the texture map tiles in Map, you need to copy and rename any one of the map files so that the U and V indexes or tile number is replaced with the following special tags:

 #,##,###,####  <-  tile number
 U,UU,UUU,UUUU  <-  tile U index
 V,VV,VVV,VVVV  <-  tile V index

For example, if you're using a U/V convention and you maps are named like this ...

 fish-color-00,00.exr
 fish-color-01,00.exr
 fish-color-01,01.exr

... then you should copy one of those files and rename it like this ...

 fish-color-UU,VV.exr

... then that file is selected for the Map value. UVLayout will then replace the UU and VV tags with their actual values when trying to find the texture map files for polygons in those tiles.

If you're using tile sequence numbering ...

 fish-color-1001.exr
 fish-color-1002.exr
 fish-color-1012.exr

... then you should copy one of those files and rename it like this ...

 fish-color-####.exr
... and selected that file for the Map value. UVLayout will then replace the #### with the tile number. By default, UVLayout will examine the UVs in the original mesh to determine the maximum U index, but many people use "10". If that's you too, make sure you change the Max U value to "10" before repainting.