|
|
|
|
|
|
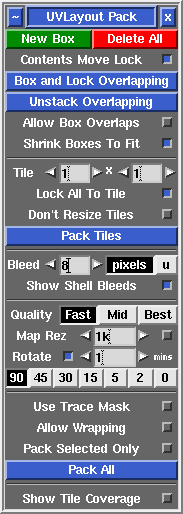
Open up the Pack panel to find tools for the tight packing of UV shells to minimize empty texture space. Currently shells are only moved around in this process, so you may need to rotate some by hand for optimum packing.
[Professional Version Only]
- New Box
- This creates a new packing box around any picked shells. Shells can be place in or taken out of an existing box simply by dragging them with the usual Space-MMB combination. Use the Del hotkey to delete a box; moving all of the shells outside of a box will also delete it. Click on Delete All to delete all boxes.
- Use the [ or ] hotkeys to repack the box under the mouse pointer. If no box is under the mouse pointer, then all shells and boxes will be packed into the 0-to-1 texture square.
- A box (and its contents) can be moved around using the Space-MMB combination on one of its corner handles. It can be reshaped using Ctrl-MMB on one of these handles; this will also repack that box. Use the \ hotkey to rotate a box by 90 degrees.
- Select boxes by clicking on one of their corner handles, and they can then be rotated, moved or scaled with the usual Space LMB/MMB/RMB combinations. Selected boxes can also be transformed from the Move/Scale/Rotate panel buttons.
- By default, boxes are free, meaning they will be moved around as required during the packing process. You can fix a box's position with the { or } hotkey; this will turn it from green to blue. Other shells and boxes will then be packed around that box, but it wont be moved itself. Use the same hotkey if you want to toggle it back to free moving.
- Quality Fast/Mid/Best
- You will get tighter packing with Best selected, but Fast isn't too bad either, and its a lot faster. Mid is part way between these two.
- Map Rez
- Specify here the resolution of the texture map you expect to use with the UVs. This in combination with the Bleed value determines the apparent size of the gap left between the shells after packing.
[Professional Version Only]
- Rotate
- Tick this and shells will be rotated by 90, 180 or 270 degrees to see if that gives better packing. It just randomly tries different combinations, so use the arrows to set the amount of time you want to let it run for. Use the | hotkey to lock or unlock the orientation of individual or select shells or boxes. Shells or boxes locked in this way won't be rotated, but can still be moved around during the packing.
- Tile
- If you want your shells and boxes packed across multiple tiles, specify the dimensions of that tile grid here. Try not to make the grid arbitrarily large (e.g. 100 x 1) if smaller values will do, as this will reduce the precision/tightness of the packing.
- Bleed
- The Bleed value controls the pixel size of the gap left between shells after packing.
- Pack All
- Clicking on Pack All will repack the contents of all boxes, then packs everything into the 0-to-1 texture square or tile grid. You might do this if you have changed the Bleed setting and want to apply that across all shells and boxes.
- Show Tile Coverage
- Tick this to show, after packing, a percentage covered value at the top of each tile. The higher this number the better, indicating less empty wasted space.
- Show Shell Bleeds
- Tick this to see a visual indicator of the pixel bleed region around each shell. If you want to manually position shells, this is a good way ensure there's enough gap left between them.
- Allow Box Overlaps
- Sometimes space will be left inside a box after packing. Ticking this option will allow other boxes or shells to use this empty space during global packing operations.
- Shrink Boxes To Fit
- Tick this to shrink wrap boxes around the contents after packing.
- Align Shell to Axes
- Normally shells are oriented like they are in the original 3D model (i.e. if a block is leaning over, it will be in UV), but often its preferable to have your rectangular polys/shells lined up with the pixel grid. If you tick this option then shells will be squared up during packing.
- Don't Resize Shells
- By default, UVLayout will uniformly enlarge or shrink all the UV shells to minimize the amount of empty space left after packing. Tick this if you don't want the shells resized.
- Lock All To Tile
- Shells wont be moved outside of their current tile during packing. Ticking this option affects all shells, or you can use the # hotkey to apply the locking selectively to shells and boxes.
- Hotkeys
-
[ or ]      : pack shells in box, or if no box is picked, packs all shells
{ or }      : toggle box fixed/free status
\           : rotate box 90 degrees, or if no box is picked, rotates shells
Ctrl-\      : rotate shell, not surrounding box
Del         : delete box
|           : toggle orientation lock for shell, selected shells or box
Pad 1/3/7/9 : toggle corner preference for shell, selected shells or box
#           : toggle tile lock for shell, selected shells or box
|
