|
|
|
|
|
|
UVLayout is a stand-alone application for the creation and editing of UV coordinates for 3D polymeshes and subdivision surfaces. Used by professionals in the games and visual effects industries, by hobbyists of all ilks and by students, UVLayout's unique approach gives texture artists the tools they need to produce high quality low distortion UVs in significantly less time than they would by traditional methods.
Over the following pages the UVLayout GUI will be described, working from the top to the bottom of the main window. Use the menu to the left to move through the various chapters. If you want to jump right into using UVLayout, you should at least read the Quick Start chapter.
Note: Sections tagged with a [Professional Version Only] label describe features only available in the Professional version of UVLayout. Click on the [Professional Version Only] link to cycle through these sections.
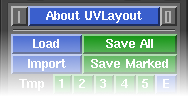
The top row of the UVLayout main window (see image right) consists of three buttons:
- Pin
- Click on the gray button to the left to pin/save the current window position and size; UVLayout will then open up like that until a new shape is set.
- About UVLayout
- Click on About UVLayout to find the application version and build date, to check for updates, to view the User Guide, and to change some preferences. See below for details. MMB click'n'drag the button to move the main GUI window around.
- Max
- Click on the gray button to the right to maximize the open windows; this moves the main GUI to the top left, and expands the graphics window to fill the remainder if the screen. Click the maximize button again to restore the previous window positions.
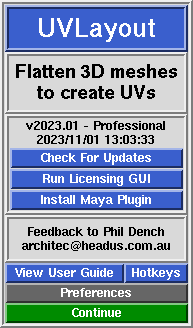
When you click on the About UVLayout button a window (see image right) pops up, showing the version and build date of the UVLayout that you are currently running.
- Check For Updates
- Click this button to check if there's a more recent version to the one you're currently running. This will open up a window in your default web browser, and if more recent versions are available, details about the new features and bug fixes will be displayed.
- Run Licensing GUI
- Opens up the headus licensing application, which will tells you various information about your system and any licenses you have. If you have a temporary license, it will also tell you how much time is left.
- Install Maya Plugin
- If a Maya installation is detected, then this button will be visible, allowing you to install the plugin component with a single click. See the Maya Plugin chapter for details.
- Try Professional Version
- This button will restart UVLayout in Professional version trial mode, with everything but the Save buttons enabled. This gives you the opportunity to test out all the features of UVLayout described in this User Guide and as shown in the training videos. You'll only see this button when running the Demo or Hobbyist versions of UVLayout.
- Try Hobbyist Version
- This button will restart UVLayout in Hobbyist version trial mode. This gives you the opportunity to try out the features provided in that version of UVLayout. You'll only see this button when running the Demo version of UVLayout.
- View User Guide
- Click this button to view a PDF version of the User Guide in your default browser. Its loading a file included in the software installation, so you don't need to be connected to the internet to view it.
- Hotkeys
- This opens up a window that shows a list of the most common hotkeys used in UVLayout.
Preferences
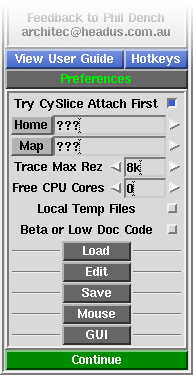
Click on the Preferences button to open up the preferences panel. In there are a number of settings you can change that will be remembered next time you run UVLayout.
- Try CySlice Attach First
- This setting only applies to UVLayout users with a combination of UVLayout and CySlice floating licenses. When turned on, UVLayout will check to see if a CySlice license is already allocated to that workstation; if it is, it'll attach to that license instead of looking further for a free UVLayout license.
- Home
- This determines which directory is opened when the Load or Save buttons are first used. Under Windows it defaults to the user's home folder, and under Linux its undefined (i.e. "???"). When the Home directory is undefined, the Load/Save directory will be the same as where UVLayout was started from, so that's the Desktop if started from a Desktop icon, or the same as the shell window if started from a command line. To change the Home directory, click the right arrow, then browse and select the directory you want. To unset the Home directory, click the gray Home button.
- Note: The Home directory is ignored if a file is drag'n'dropped onto the UVLayout Desktop icon. In that situation, the location of the dropped file is used for subsequent Load/Save operations.
- Map
- When using the T hotkey, UVLayout cycles between error feedback, a checker pattern, and a mapped on texture map. You can change what this texture map is by clicking on the right arrow and browsing to the file you want to use.
- Trace Max Rez
- When using the Display panel's Trace feature, the map you select is reduced to this size. If you have a modern graphics adapter with a large amount of texture memory, you can probably increase this value to get sharper looking background images.
- Free CPU Cores
- For tools that can utilize multiple CPU cores, this preference tells UVLayout how many CPU cores you want left free for other work you might want to do. Set it to 0 and UVLayout will use all cores.
- Local Temp Files
- When OBJ files are loaded or saved, temporary files are created as the geometry is converted from and to UVLayout's native format. By default these temp files are created in system temporary folders, but if you tick this option, they will be created in the same folder as the file being loaded or saved. If you're experiencing problems loading an OBJ, or saved OBJs are zero sized, turning this on may fix that.
- Beta or Low Doc Code
- Enables experimental or undocumented tools.
Load Settings
- Max Shells
- When an OBJ file is loaded in Edit mode, the number of UV shells is checked first; if there's more than this setting, the load is aborted and a message is displayed suggesting that the Weld UVs load option might be needed. If your mesh really does have more than the default of 2000 shells (e.g. individual leaves on a tree) then you can increase the shell limit here.
- Max Tiles
- Also when an OBJ file is loaded, the overall bounding box of the UVs is checked, and if its larger than this value, an error is displayed. If the UVs of your mesh really do span over more than 100 tiles, then you can increase that limit here.
- Big World Import Fix
- If you are importing objects that are part of a much larger world (e.g. a gargoyle on top of a cathedral), and experience things like collapsing shells while flattening, try turning this option on. It moves the objects to the origin on import, and moves them back out on export.
- Less Strict Checking
- Be default UVLayout checks for problems in the geometry, such as non-manifold edges, and tries to fix them. If you tick this option, some of those problem areas will be ignored and left alone, though this may affect UVLayout's ability to flatten them correctly.
- Auto Save On Import
- Because the OBJ Import function is brand new, this option is on by default; it will save your current UVs before the additional mesh and UVs are loaded in.
- Retry Connections
- If using floating licenses, the license server is checked each time a file is loaded. By default only one connection is attempted, but if you consistently get "cannot connect" type errors when loading a mesh, try turning this option on to retry the check if the first fails. This is only a work-around measure though; ideally you should investigate why the license server is so laggy (e.g. overloaded server or network connection?).
- Set Size
- When an object is loaded into UVLayout, the surface area is computed and an initial real-world to UV scaling is decided upon so that the flattened out object fills the UV square. When the UV shells are packed, this scaling is also adjusted. The aim of the scaling is to minimize wasted space in the UV maps, but the other effect is that the UVs for different sized objects will be at different scales.
- If you want a fixed UV scaling across multiple objects, then enter a value into Set Size; this number is the size of the UV square in real-world dimensions. If you need a clue as to an appropriate value, load in the largest object you have, create its UVs as you normally would, then look up the current UV scaling under the Move/Scale/Rotate panel. If you then copy that value into the Set Size preference, all remaining objects you load will have UVs at the same scale as your largest object.
- As a safety measure, if you have defined a Set Size value but an object being loaded is either less than 10 times smaller or greater than 10 times larger than that, the UV scale isn't set and a warning pops up. If you want to force the UV scaling for smaller objects, enter a value into the Min field. For example, if your Set Size is 100, entering 1 into the Min field will force the UV scaling for objects up to 100 times smaller. Set the Max field to force the UV scaling of larger objects, but be careful here; if you raise it too high and load a huge object, UVLayout will slow right down as it tries to draw the hundreds of UV tiles you'll get when in the UV view.
- Note: When changing any of the Set Size or Min or Max fields, make sure you type the Enter key to set and save the value.
Edit Settings
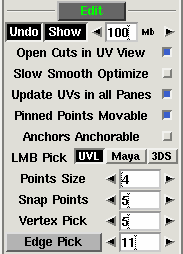
- Undo Show
- When Undo is enabled, the name of the previous action is displayed towards the top right of the graphics window, along with a small bar that indicates how full the Undo buffer is; to hide this information, click on the Show button to turn it off. The Undo buffer starts off at 100Mb, which means that UVLayout will use up to this amount of RAM when saving the undo restore information; if you are on a system with limited RAM, you may want to reduce this number, and conversely, increasing it on a larger system will give you more levels of undo.
- Open Cuts in UV View
- By default this is on, and it means that when you make C hotkey cuts in the UV view, the UVs pull apart slightly to create a gap. Turning this off means that the cuts will not open up.
- Slow Smooth Optimize
- By default this is on, and it means that when the Optimize is run, shells are redrawn at every flattening optimization step. This makes it look nice and smooth when its running, but the continuous redrawing does use a significant chunk of available CPU. By turning this off, the optimize will only redraw shells twice a second; even though it looks slower, the CPU is now spending more time flattening, and so it'll get to the optimal result quicker.
- Update UVs in all Panes
- When this is ticked, all display panes update when you make interactive changes to the UVs. If you are editing detailed meshes, this may slow down the response, so turning this off will improve that.
- Pinned Points Movable
- Select whether pinned points can be moved with Shift-MMB.
- Anchors Anchorable
- Selects whether anchor points will snap to other anchor points when being moved.
- LMB Pick
- Choose your preferred method for left mouse button picking of shells in the UV view. Either original UVLayout flavor, or Maya, or 3DS Max picking methods.
- Points Size
- Sets the size in pixels of tagged points.
- Snap Points
- Sets the distance in pixels for UV point to point snapping.
- Vertex Pick
- Sets the number of pixels from a vertex before an edge becomes selectable.
- Edge Pick
- Sets the pixel width of the edge picking region. If you have a mesh loaded and are in the UV view, a rectangle will be drawn along edges as visual feedback while this value is being adjusted. Click the Edge Pick button to toggle the display of this feedback graphic at all times.
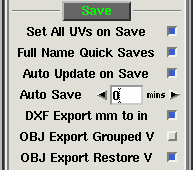
Save Settings
- Set All UVs on Save
- Normally only flattened polys will be saved with UVs. Enabling this preference will force UVLayout to assign a planar projection to any unflattened polys when the mesh is saved out to OBJ files.
- Full Name Quick Saves
- By default, the Tmp and E buttons and the auto save will create files called tmp#.uvl, edit##.uvl and auto#.uvl in the same folder as the loaded mesh. If you are editing multiple meshes in the same folder, you may want to tick this option; the quick save files will then start with the name of the original mesh.
- Auto Update on Save
- Earlier versions of UVLayout would save out simplified OBJ files that just included the geometry and UVs of the loaded object, and a separate Update button was used to merge the edited UVs back into the original OBJ file if required. This process is now automatic, so all saved out OBJ files are direct copies of the original imported OBJ file with just the UV coords changed. If you want the original behavior, untick this option.
- Auto Save
- Select the number of minutes between auto saves, and up to 5 files are created in a cycle (i.e. 1 to 5 and then back to 1). Set this to "0" to turn off the auto save feature.
- DXF Export mm to in
- By default, UVLayout will export DXF patterns (flattened geometry) with all dimensions in inches, where the loaded mesh is assumed to be in millimeters. That is, the exported DXF patterns are 25.4 times smaller than the imported OBJ geometry. Untick this option to turn this scaling off and export the DXF patterns at the same scale as the imported OBJ geometry.
- OBJ Export Grouped V
- By default, all vertex information is written into exported OBJs at the start of the file. If you tick this option, then the vertexes are grouped in with the faces; this resolves problems that might occur if the vertexes are grouped separately to the faces when importing into Maya.
- OBJ Export Restore V
- By default, the vertexes of exported OBJ files may be very slightly offset from the original vertex positions. To fix this, turn on this option to preserve exactly the coordinate values from the original imported OBJ.
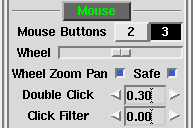
Mouse Settings
- Mouse Buttons
- Sometimes UVLayout will get confused about the number of buttons your mouse has, particularly if you're on a laptop and are swapping between an external mouse in an inbuilt touch pad without completely rebooting. This may affect things like the Space-MMB or Ctrl-MMB actions to move shells and points around. You can use this setting to force UVLayout to treat the mouse as though it has the number of buttons you select. Note: If you change this setting, you will need to reload your object for the change to come into effect.
- Wheel Slider
- Move the slider to the right to increase the power of a wheel mouse's zoom function. Move it to the left to decrease the power, and go all the way to the left to turn off the zoom function completely.
- Wheel Zoom Pan
- When this option is ticked, the view will pan as well as zoom when using the mouse scroll wheel, shifting the view focus to the section of the model that the mouse cursor is aiming at. Most other 3D applications just zoom about the center of the window, so if you prefer that, untick this option.
- Safe
- When ticked, the Zoom Pan function is tweaked to reduce the chances of getting lost.
- Double Click
- Under OS X and Linux, this sets the double click speed, in seconds, for navigation actions in the file selection windows. If, for example, you are having problems double clicking a file to open it in the UVLayout Load window, then increase this setting. Under Windows you would need to use the standard Windows Mouse control panel to adjust the double click speed.
- This settings also controls the double tap speed for hotkey actions like the edge straightening Double-S. If you find you can't tap keys fast enough, increase this value. Adjusting the double tap speed works under OS X, Linux and Windows.
- Click Filter
- In extremely rare cases (just one user report so far), either because of a mouse setting or faulty mouse, UVLayout gets two click events for every one physical button click. Increase the filter value here to ignore the second click.
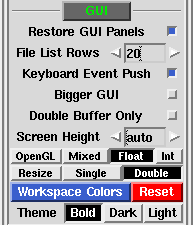
GUI Settings
- Restore GUI Panels
- If you turn this on, then panels opened up when you exit UVLayout are reopened the next time UVLayout is run.
- File List Rows
- Sets the number of files/folders displayed in the file selection dialogs.
- Keyboard Event Push
- By default, UVLayout will automatically push keyboard events between the GUI and graphics windows. This allows you to press a button in the GUI, then move the mouse pointer to the graphics window and use a keyboard hotkey without first having to select that window. You can turn that off with this preference, but there wouldn't be any reason to do this normally. Windows only.
- Bigger GUI
- Turn this on to increase the size of the GUI for high resolution displays. Linux only.
- Double Buffer Only
- To help speed up some actions, UVLayout will occasionally draw into the front display buffer. On some OS/hardware combinations though, drawing into the front buffer can cause problems. If you notice odd things happening in the display window, then turn this option on. On Mac OS X systems, this is on by default, and shouldn't be turned off.
- Screen Height
- When opening up a GUI panel, UVLayout will float it instead if the normal opening would make the main GUI taller than the screen height. On OS X and Linux systems, sometimes the automatic screen height calculation is wrong; here you can set the Screen Height preference to the correct value.
- OpenGL
- This sets the vertex mode for the OpenGL drawing. By default its on Mixed, which normally works fine. On some display hardware/driver combinations though, this can result in very poor drawing performance. If you experience that, try either Float or Int. If you click on the OpenGL button itself, that will launch an automatic calibration test that will determine the best OpenGL setting for your system.
- Resize
- On some rare graphics hardware and driver combinations, resizing the editing window may cause it to die. UVLayout runs a test to check for this when it first runs, and selects an alternate redraw method if the issue is detected. Here you can manually set the redraw method (Double by default, or Single for the fix), or re-run the test by clicking the Resize button.
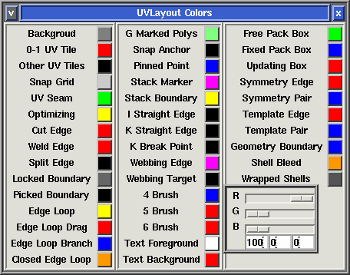
- Workspace Colors
- Click this button to pop up the color preferences panel. Click on any of the colored buttons to adjust the RGB sliders or percentage values. Click the Reset button to return all colors to their default values.
- Theme
- Choose between the original Bold or Dark or Light color themes for the main GUI panels.
|
