User Guide: Load/Save
From UVLayout Docs
| Revision as of 05:55, 21 October 2016 (edit) Headus (Talk | contribs) (→Save Marked) ← Previous diff |
Revision as of 05:55, 21 October 2016 (edit) (undo) Headus (Talk | contribs) (→Save Marked) Next diff → |
||
| Line 56: | Line 56: | ||
| == Save Marked == | == Save Marked == | ||
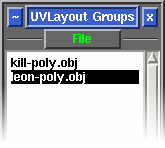
| - | To save out just part of the loaded mesh, first mark those polys with the '''G''' hotkey, then click the '''Save Marked''' button. [[Image:UserGuide-Groups-File.png|right|]] | + | [[Image:UserGuide-Groups-File.png|right|]]To save out just part of the loaded mesh, first mark those polys with the '''G''' hotkey, then click the '''Save Marked''' button. |
| If you have previously imported one or more additional files, and only want to save out one of the loaded files, then you can quickly mark all the polys of one or more of the loaded files from the file group list. Just LMB click on the filename in the list and all those polys will be marked. | If you have previously imported one or more additional files, and only want to save out one of the loaded files, then you can quickly mark all the polys of one or more of the loaded files from the file group list. Just LMB click on the filename in the list and all those polys will be marked. | ||
Revision as of 05:55, 21 October 2016
|
This section of the main UVLayout window contains all the buttons used to load and save files.
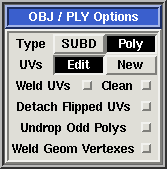
LoadThe main way to load files into UVLayout is to drag'n'drop them onto the headus UVLayout desktop icon. Files in UVLayout's own UVL format can also be double clicked to open them up. And finally, if UVLayout is already running, you can use the Load button to load a new file. When loading OBJ or PLY files, there's a few options to choose between:
ImportWhere Load will replace the existing mesh with the selected file, use Import to add another mesh into the current scene. This will allow you to copy or share UVs between the meshes, and also do things like pack shells across two or more meshes to share a single UV map. After clicking Import and selecting the file, it will appear as a pink tinted mesh in the scene. You can temporarily move it around with Space-MMB, rotate with Space-LMB, and scale with Space-RMB. Also a new row of buttons will appear in the main GUI window:
Save AllWhen saving your work, you have a choice between three file formats; UVL, PLY or OBJ:
Save MarkedTo save out just part of the loaded mesh, first mark those polys with the G hotkey, then click the Save Marked button.If you have previously imported one or more additional files, and only want to save out one of the loaded files, then you can quickly mark all the polys of one or more of the loaded files from the file group list. Just LMB click on the filename in the list and all those polys will be marked. Tmp/E ButtonsThe Tmp 1 to 5 buttons can be used to quickly save the current scene into temporary files, named temp1.uvl to temp5.uvl, that can be loaded later on if something goes wrong.The buttons are color coded:
The E button also saves the current scene, but into files named edit01.uvl, edit02.uvl etc, always creating the next unused filename in the sequence. You can also enable a regular auto save using the Auto Save setting under the Preferences panel. To include the name of the original mesh into the quick save files, tick the Full Name Quick Saves preference. Update - Older VersionsThe Update button pops up a file selection window where you can select a previously loaded OBJ file that you want to update with the current UVs. The original file isn't overwritten though; a new file called whatever-uvlayout.obj is created, which is a copy of the original file with all the material/grouping information preserved and only the UVs changed. Note: In the current release of UVLayout, this blending of the new UVs with the loaded OBJ file is automatic, so you only ever need to use the Save button. The Update button will be hidden away, and only appears when it might be needed, such as when you've loaded a UVL file that was saved out from an earlier version of UVLayout. File Selection GUIUVLayout's File Selection window is divided into four main areas; the directories list, the files list, the full path, and the action buttons (see diagram to the right). In the directories area, the sub-directories in the current directory are listed, along with "..", the current directory's parent. In the files area, the files in the current directory that match the filter are listed. In the path area the full path of the current directory, and selected file, is displayed. And finally, in the buttons area are the buttons you use to preview the selected file, to load/save the selected file, or abort from the load/save operation.To change directory:
To access the Desktop (Windows Only) and other filesystems:
To change the files listed:
To select a file:
The other buttons:
To get more information about the listed files, click on the black right arrow after the Filter input field. Click on the 'Filename', 'Size' or 'Modified' labels to sort the list by that value. |


