User Guide: Layers
From UVLayout Docs
(Difference between revisions)
| Revision as of 08:04, 1 November 2023 (edit) Headus (Talk | contribs) ← Previous diff |
Current revision (08:07, 1 November 2023) (edit) (undo) Headus (Talk | contribs) |
||
| Line 11: | Line 11: | ||
| ; Move : Move all picked shells into active layer. | ; Move : Move all picked shells into active layer. | ||
| - | Each layer has five widgets: | + | The top layer is special, and contains all the undropped shells. Every other layer has five widgets: |
| ; Active : Click the first toggle to make that the active (green) layer. Click an already active green toggle and all other layers are hidden. Collapsing or killing the '''Layers''' panel will make all layers/shells active. | ; Active : Click the first toggle to make that the active (green) layer. Click an already active green toggle and all other layers are hidden. Collapsing or killing the '''Layers''' panel will make all layers/shells active. | ||
Current revision
|
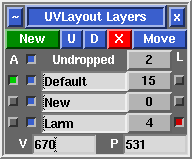
[Professional Version Only] Open up the Layers panel to organize shells into different layers (maximum of 5). Shells in the upper layers will appear over shells in the lower layers where they overlap. Layer assignments are saved into and restored from UVL files, but will be lost when the mesh is exported to an OBJ file.
The top layer is special, and contains all the undropped shells. Every other layer has five widgets:
|
