User Guide: Layers
From UVLayout Docs
(Difference between revisions)
| Revision as of 04:23, 5 July 2017 (edit) Headus (Talk | contribs) ← Previous diff |
Revision as of 04:28, 5 July 2017 (edit) (undo) Headus (Talk | contribs) Next diff → |
||
| Line 15: | Line 15: | ||
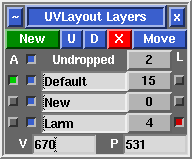
| ; Active : Click the gray button to make that the active (green) layer. Collapsing or killing the '''Layers''' panel will make all layers/shells active. | ; Active : Click the gray button to make that the active (green) layer. Collapsing or killing the '''Layers''' panel will make all layers/shells active. | ||
| - | : Shells ''not'' in the active layer are tinted gray and behave as if they are locked. They can't be re-flattened, packed, cut, welded or edited in any other way; they can only be moved, rotated and scaled. | + | : Shells ''not'' in the active layer are tinted gray and behave as if they are locked. They can't be re-flattened, packed, cut, welded or edited in any other way. They can be moved, scaled and rotated with the Space-LMB/MMB/RMB actions, but stay put when the Move/Scale/Rotate tools are used. |
| ; Name : Set the name of the layer. | ; Name : Set the name of the layer. | ||
Revision as of 04:28, 5 July 2017
|
Open up the Layers panel to organize shells into different layers (maximum of 5). Shells in the upper layers will appear over shells in the lower layers when they overlap. Layer assignments are saved into and restored from UVL files, but will be lost when the mesh is exported to an OBJ file.
Each layer has four widgets:
|
