User Guide: Render
From UVLayout Docs
(Difference between revisions)
| Revision as of 06:23, 28 October 2009 (edit) Headus (Talk | contribs) ← Previous diff |
Revision as of 06:24, 28 October 2009 (edit) (undo) Headus (Talk | contribs) Next diff → |
||
| Line 14: | Line 14: | ||
| Once created, the image is displayed; you can then use '''File|Save''' or '''Ctrl-S''' to save it to a different location if you wish, using a ".tif" or ".jpg" filename extension to select the format of the saved image. | Once created, the image is displayed; you can then use '''File|Save''' or '''Ctrl-S''' to save it to a different location if you wish, using a ".tif" or ".jpg" filename extension to select the format of the saved image. | ||
| + | |||
| + | == Repaint == | ||
| + | |||
| + | kjgkjgkj | ||
Revision as of 06:24, 28 October 2009
|
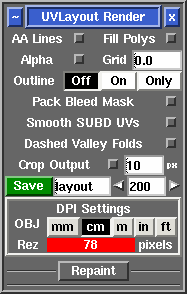
Open up the Render panel if you want to save out the current UV layout to a tiff image file. This file could then be used as a template for texture painting.
Once created, the image is displayed; you can then use File|Save or Ctrl-S to save it to a different location if you wish, using a ".tif" or ".jpg" filename extension to select the format of the saved image. Repaintkjgkjgkj |
