User Guide: Edit
From UVLayout Docs
(Difference between revisions)
| Revision as of 05:15, 11 March 2008 (edit) Headus (Talk | contribs) ← Previous diff |
Revision as of 06:10, 6 May 2008 (edit) (undo) Headus (Talk | contribs) Next diff → |
||
| Line 7: | Line 7: | ||
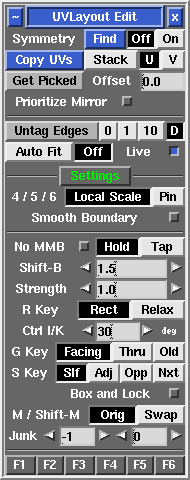
| ; Copy UVs Stack/U/V {{Pro2|pro4|User_Guide:_Edit_Options#pro5}} : To copy UVs between parts of your mesh, first click the '''Copy UVs''' button, then LMB select an edge in the source shell (i.e. the shell you want to copy UVs the from); you can select this edge in either the UV or 3D views. Next LMB select edges, in the same relative position, for the target shells; by selecting multiple edges, you can copy to more than one shell at a time. Tap the space bar when you have selected all the edges and the UVs will be copied across if the selected shells match. To match, shells must have the same topology (i.e. the same number and arrangement of polygons). Before copying, select '''Stack''' if the you want the target shells stacked on top of the source shell, or '''U''' or '''V''' if you want them arranged alongside. | ; Copy UVs Stack/U/V {{Pro2|pro4|User_Guide:_Edit_Options#pro5}} : To copy UVs between parts of your mesh, first click the '''Copy UVs''' button, then LMB select an edge in the source shell (i.e. the shell you want to copy UVs the from); you can select this edge in either the UV or 3D views. Next LMB select edges, in the same relative position, for the target shells; by selecting multiple edges, you can copy to more than one shell at a time. Tap the space bar when you have selected all the edges and the UVs will be copied across if the selected shells match. To match, shells must have the same topology (i.e. the same number and arrangement of polygons). Before copying, select '''Stack''' if the you want the target shells stacked on top of the source shell, or '''U''' or '''V''' if you want them arranged alongside. | ||
| - | ; Edge Extend 0/1/10 : Select the look-ahead range for cut'n'weld operations. Click on the '''Edge Extend''' button itself to unselect all red or yellow highlighted edges. | + | ; Untag Edges 0/1/10 : Select the look-ahead range for cut'n'weld operations. Click on the '''Untag Edges''' button itself to unselect all red or yellow highlighted edges. |
| ; Auto Fit/Off : When '''Auto Fit''' is on, all current UVs are re-normalized (scaled to fit in the 0 to 1 range) every time a UV shell is moved or modified. When '''Off''', they aren't, so you can move shells beyond this range and out onto other tiles. Use the + and _ keys to scale the UV unit box up and down. | ; Auto Fit/Off : When '''Auto Fit''' is on, all current UVs are re-normalized (scaled to fit in the 0 to 1 range) every time a UV shell is moved or modified. When '''Off''', they aren't, so you can move shells beyond this range and out onto other tiles. Use the + and _ keys to scale the UV unit box up and down. | ||
Revision as of 06:10, 6 May 2008
|
Underneath the Display panel are a few miscellaneous options you can select between when editing meshes.
|
