User Guide: Edit
From UVLayout Docs
(Difference between revisions)
| Revision as of 05:53, 7 September 2007 (edit) Headus (Talk | contribs) ← Previous diff |
Revision as of 08:45, 16 October 2007 (edit) (undo) Headus (Talk | contribs) Next diff → |
||
| Line 1: | Line 1: | ||
| {{:User Guide: Menu}} [[Image:UserGuide-Edit.png|right|]] Underneath the '''Display''' panel are a few miscellaneous options you can select between when editing meshes. | {{:User Guide: Menu}} [[Image:UserGuide-Edit.png|right|]] Underneath the '''Display''' panel are a few miscellaneous options you can select between when editing meshes. | ||
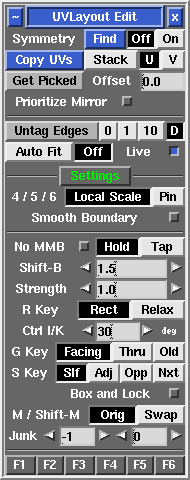
| - | ; Symmetry Find Off/On {{Pro}} : If parts of your mesh have mirrored topology, you can use the Symmetry tool to speed up cut'n'weld operations. Click on the '''Find''' button, then LMB click on any edge that sits on the mirror line (i.e. the line that divides the two symmetrical halves), then tap the space bar to continue; if all goes well, one half of the mesh will be shaded darker than the other, indicating that symmetry editing is now active; non-symmetrical polys are shaded yellow. Cut, weld, detach, attached, drop and undrop actions from then on will be mirrored across to the other half. Click on the '''Off''' button if you want to turn that mirroring off. | + | ; Symmetry Find Off/On {{Pro2|pro|User_Guide:_Edit_Options#pro1}} : If parts of your mesh have mirrored topology, you can use the Symmetry tool to speed up cut'n'weld operations. Click on the '''Find''' button, then LMB click on any edge that sits on the mirror line (i.e. the line that divides the two symmetrical halves), then tap the space bar to continue; if all goes well, one half of the mesh will be shaded darker than the other, indicating that symmetry editing is now active; non-symmetrical polys are shaded yellow. Cut, weld, detach, attached, drop and undrop actions from then on will be mirrored across to the other half. Click on the '''Off''' button if you want to turn that mirroring off. |
| : If parts of your mesh are symmetrical but detached (e.g. a pair of shoes), first LMB click on any edge in one shell, then MMB click on the mirrored edge in the other shell, then tap the space bar to continue. | : If parts of your mesh are symmetrical but detached (e.g. a pair of shoes), first LMB click on any edge in one shell, then MMB click on the mirrored edge in the other shell, then tap the space bar to continue. | ||
| Line 9: | Line 9: | ||
| ; Auto Fit/Off : When '''Auto Fit''' is on, all current UVs are re-normalized (scaled to fit in the 0 to 1 range) every time a UV shell is moved or modified. When '''Off''', they aren't, so you can move shells beyond this range and out onto other tiles. Use the + and _ keys to scale the UV unit box up and down. | ; Auto Fit/Off : When '''Auto Fit''' is on, all current UVs are re-normalized (scaled to fit in the 0 to 1 range) every time a UV shell is moved or modified. When '''Off''', they aren't, so you can move shells beyond this range and out onto other tiles. Use the + and _ keys to scale the UV unit box up and down. | ||
| - | ; O/C/N {{Pro}} : When '''O''' is selected the original (pre-v1.9) flattening algorithm is used for all flattening calculations. When '''C''' is selected, a more recent method is used. When '''N''' is selected, the newest method is used; it handles long thin polys better. The older methods are made available in case the newer methods fail for some reason. | + | ; O/C/N {{Pro2|pro1|User_Guide:_Optimize#pro}} : When '''O''' is selected the original (pre-v1.9) flattening algorithm is used for all flattening calculations. When '''C''' is selected, a more recent method is used. When '''N''' is selected, the newest method is used; it handles long thin polys better. The older methods are made available in case the newer methods fail for some reason. |
| ; 4/5/6 Local Scale / Pin : When '''Local Scale''' is selected, the 4/5 hotkeys paint a local scaling into the polys under the brush; this has the effect of moving the UVs in that area in or out during any further flattening, while preserving the shape of the polys as much as possible. | ; 4/5/6 Local Scale / Pin : When '''Local Scale''' is selected, the 4/5 hotkeys paint a local scaling into the polys under the brush; this has the effect of moving the UVs in that area in or out during any further flattening, while preserving the shape of the polys as much as possible. | ||
Revision as of 08:45, 16 October 2007
|
Underneath the Display panel are a few miscellaneous options you can select between when editing meshes.
|
