User Guide: Load/Save
From UVLayout Docs
| Revision as of 05:56, 20 November 2006 (edit) Headus (Talk | contribs) m ← Previous diff |
Revision as of 03:21, 27 November 2006 (edit) (undo) Headus (Talk | contribs) (→Update) Next diff → |
||
| Line 36: | Line 36: | ||
| == Update == | == Update == | ||
| - | The Update button pops up a file selection window where you can select a previously loaded OBJ file that you want to update with the current UVs. This preserves all the material/grouping information, where the OBJ Save leaves this information out. | + | The Update button pops up a file selection window where you can select a previously loaded OBJ file that you want to update with the current UVs. The original file isn't overwritten though; a new file called '''''whatever''-uvlayout.obj''' is created, which is a copy of the original file with all the material/grouping information preserved and only the UVs changed. |
| == Tmp/E Buttons == | == Tmp/E Buttons == | ||
Revision as of 03:21, 27 November 2006
|
This section of the main UVLayout window contains all the buttons used to load and save files.
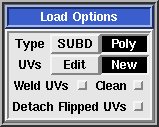
LoadThe main way to load files into UVLayout is to drag'n'drop them onto the headus UVLayout desktop icon. Files in UVLayout's own UVL format can also be double clicked to open them up. And finally, if UVLayout is already running, you can use the Load button to load a new file. When loading OBJ or PLY files, there's a few options to choose between:
SaveWhen saving your work, you have a choice between three file formats; UVL, PLY or OBJ:
UpdateThe Update button pops up a file selection window where you can select a previously loaded OBJ file that you want to update with the current UVs. The original file isn't overwritten though; a new file called whatever-uvlayout.obj is created, which is a copy of the original file with all the material/grouping information preserved and only the UVs changed. Tmp/E ButtonsThe Tmp 1 to 5 buttons can be used to quickly save the current scene into temporary files, named tmp1.uvl to tmp5.uvl, that can be loaded later on if something goes wrong. The buttons are color coded:
The E button also saves the current scene, but into files named edit01.uvl, edit02.uvl etc, always creating the next unused filename in the sequence. |

