User Guide: Render
From UVLayout Docs
| Revision as of 05:36, 22 July 2021 (edit) Headus (Talk | contribs) (→Repaint) ← Previous diff |
Current revision (04:26, 3 February 2025) (edit) (undo) Headus (Talk | contribs) (→Repaint) |
||
| (8 intermediate revisions not shown.) | |||
| Line 1: | Line 1: | ||
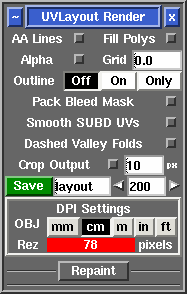
| - | {{:User Guide: Menu}} [[Image:UserGuide-Render.png|right|]] Open up the '''Render''' panel if you want to save out the current UV layout to a tiff image file. This file could then be used as a template for texture painting. | + | {{:User Guide: Menu}} [[Image:UserGuide-Render.png|right|]] Open up the '''Render''' panel if you want to save out the current UV layout to an image file. This file could then be used as a template for texture painting. |
| ; AA Lines : Tick this to smooth out the jaggies in the saved image, though this slows down the creation of the file quite a bit. | ; AA Lines : Tick this to smooth out the jaggies in the saved image, though this slows down the creation of the file quite a bit. | ||
| Line 19: | Line 19: | ||
| ; Crop Output : Tick this and the rendered images for each tile are cropped to the visible polygons, with the specified pixel border added. Alternatively, if you set the border to a value of "a", then the tile is cropped to a portrait A sized paper aspect ratio. | ; Crop Output : Tick this and the rendered images for each tile are cropped to the visible polygons, with the specified pixel border added. Alternatively, if you set the border to a value of "a", then the tile is cropped to a portrait A sized paper aspect ratio. | ||
| - | ; Save : Click on '''Save''' to save the current UV layout into a tiff file with the specified base name; the default is ''layout.tif''. | + | ; Save : Click on '''Save''' to save the current UV layout into an image file with the specified base name; the default is ''layout.jpg''. Click '''Stop''' to abort the render before it completes. |
| - | ; Name field : Change this if you want a different base name to the tiff file created. | + | ; Name field : Change this if you want a different base name to the image file created. |
| - | ; Resolution field : Set the pixel resolution for the tiff file here. | + | ; Resolution field : Set the pixel resolution for the image file here. |
| + | |||
| + | ; Type : Set the file type for the saved images. | ||
| ; DPI Settings : Ctrl-LMB click in the resolution field to enable and open up the DPI resolution settings. Select the unit of measure for the loaded geometry, and the '''Rez''' value displays how many pixels the rendered images will be. If unusually small or large, the value is highlighted in red to indicate that maybe the unit of measure is wrong or the DPI value is too high or low. | ; DPI Settings : Ctrl-LMB click in the resolution field to enable and open up the DPI resolution settings. Select the unit of measure for the loaded geometry, and the '''Rez''' value displays how many pixels the rendered images will be. If unusually small or large, the value is highlighted in red to indicate that maybe the unit of measure is wrong or the DPI value is too high or low. | ||
| - | Once created, the image is displayed; you can then use '''File|Save''' or '''Ctrl-S''' to save it to a different location if you wish, using a ".tif" or ".jpg" filename extension to select the format of the saved image. | + | Once created, the image is displayed; you can then use '''File|Save''' or '''Ctrl-S''' to save it to a different location if you wish. If multiple images were rendered, use '''Space''' and '''Backspace''' to cycle between them. |
| {{PageBreak}} | {{PageBreak}} | ||
| Line 39: | Line 41: | ||
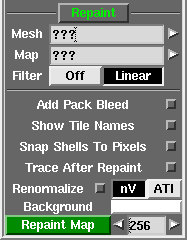
| ; Map : Select the '''original''' texture map file. | ; Map : Select the '''original''' texture map file. | ||
| + | |||
| + | ; Add : Appended to the name of the '''original''' map file to create the new repainted file. | ||
| + | |||
| + | ; Filter : The filter to use when resampling pixels from the source map. The options are '''Off''' for no filtering, or '''Lin''' for bi-linear interpolation, or '''AA''' for super-sampled anti-aliasing. Set the value to the super-sampling filter size (e.g. the default of 3 uses a 3x3 filter). Higher numbers increase quality but will also increase the repainting times. | ||
| ; Add Pack Bleed : After repainting, shell boundaries are bled out by the bleed value set in the Pack tool. This helps make the UV seams less visible when the repainted map is used as a texture. | ; Add Pack Bleed : After repainting, shell boundaries are bled out by the bleed value set in the Pack tool. This helps make the UV seams less visible when the repainted map is used as a texture. | ||
| Line 52: | Line 58: | ||
| ; Background : LMB click the rectangle to select the color of the background in the repainted maps. | ; Background : LMB click the rectangle to select the color of the background in the repainted maps. | ||
| - | ; Repaint Map : Set the output resolution, then click this to create the repainted map. | + | ; Repaint Map : Set the output resolution, then click this to create the repainted map. Click '''Stop''' to abort the repainting before it completes. |
| : The output can also be set to DPI values using the same method as describe above for the Render resolution. | : The output can also be set to DPI values using the same method as describe above for the Render resolution. | ||
Current revision
|
Open up the Render panel if you want to save out the current UV layout to an image file. This file could then be used as a template for texture painting.
Once created, the image is displayed; you can then use File|Save or Ctrl-S to save it to a different location if you wish. If multiple images were rendered, use Space and Backspace to cycle between them. [Professional Version Only]
RepaintThe Repaint tool allows you to load an old mesh and texture map into UVLayout where you can then modify the UVs (e.g. repack, optimize, modify seams) and then repaint the old map according to the new UVs. To use, the modified mesh with new UVs should be loaded into the 3D window.
Repainting Multiple MapsIf your mesh has multiple texture maps, such as color, specular and normal, then you can get UVLayout to process them in one go. Instead of selecting a texture map in the Map selector, you can load a CSV extension text file that has the names of the maps, one per line. For example ... fish-color.tif fish-spec.tif fish-norm.tif By default UVLayout will create new files for each of the repainted maps with "-repaint" added to the original filename. If you would like a different output name, or to overwrite the original file, add that to the CSV file with a comma between the original and the new names ... fish-color.tif,new-color.tif <- different output name fish-spec.tif,fish-spec.tif <- overwrite original fish-norm.tif <- keep default output name If these multiple maps are different resolutions, and you want the repainted maps to keep the same resolutions, then change the output resolution field to the equals character (i.e. =). You can also enter in a resolution multiplier (e.g. *2) or divider (e.g. /4), and then the resolutions of the output maps are adjusted accordingly. Repainting Multiple TilesIf your original UVs are spread across multiple UV tiles, with corresponding maps, then you can also repaint these to the new UVs. Instead of selecting one of the texture map tiles in Map, you need to copy and rename any one of the map files so that the U and V indexes or tile number is replaced with the following special tags: #,##,###,#### <- tile number U,UU,UUU,UUUU <- tile U index V,VV,VVV,VVVV <- tile V index For example, if you're using a U/V convention and you maps are named like this ... fish-color-00,00.exr fish-color-01,00.exr fish-color-01,01.exr ... then you should copy one of those files and rename it like this ... fish-color-UU,VV.exr ... then that file is selected for the Map value. UVLayout will then replace the UU and VV tags with their actual values when trying to find the texture map files for polygons in those tiles. If you're using tile sequence numbering ... fish-color-1001.exr fish-color-1002.exr fish-color-1012.exr ... then you should copy one of those files and rename it like this ... fish-color-####.exr... and selected that file for the Map value. UVLayout will then replace the #### with the tile number. By default, UVLayout will examine the UVs in the original mesh to determine the maximum U index, but many people use "10". If that's you too, make sure you change the Max U value to "10" before repainting. |

