User Guide: Layers
From UVLayout Docs
(Difference between revisions)
| Revision as of 02:38, 5 July 2017 (edit) Headus (Talk | contribs) ← Previous diff |
Current revision (08:07, 1 November 2023) (edit) (undo) Headus (Talk | contribs) |
||
| (21 intermediate revisions not shown.) | |||
| Line 1: | Line 1: | ||
| - | {{:User Guide: Menu}} [[Image:UserGuide-Layers.png|right|]] Blah blah blah | + | {{:User Guide: Menu}} <div id="pro"><div id="prolay"></div> {{Pro3|prolay|User Guide: Reshape#pro12}} [[Image:UserGuide-Layers.png|right|]] Open up the '''Layers''' panel to organize shells into different layers (maximum of 5). Shells in the upper layers will appear over shells in the lower layers where they overlap. Layer assignments are saved into and restored from UVL files, but will be lost when the mesh is exported to an OBJ file. |
| - | ; New : Create a new layer at the bottom of the list. If any shells are picked, they will be moved into the new layer. Currently there's a limit of 5 layers. | + | ; New : Create a new layer at the bottom of the list. If any shells are picked, they will be moved into the new layer. |
| ; U : Move the active layer up the list. | ; U : Move the active layer up the list. | ||
| Line 7: | Line 7: | ||
| ; D : Move the active layer down the list. | ; D : Move the active layer down the list. | ||
| - | ; X : Delete the active layer. Any shells in therfe will be moved into the top layer. | + | ; X : Delete the active layer. Any shells in that layer will be moved into the top layer. |
| ; Move : Move all picked shells into active layer. | ; Move : Move all picked shells into active layer. | ||
| - | Each layer has four widgets: | + | The top layer is special, and contains all the undropped shells. Every other layer has five widgets: |
| - | ; Active : Click the gray button to make this the active layer. Shells not in the active layer are tinted gray and behave as if they are locked. | + | ; Active : Click the first toggle to make that the active (green) layer. Click an already active green toggle and all other layers are hidden. Collapsing or killing the '''Layers''' panel will make all layers/shells active. |
| - | ; Name : Change the name of the layer. | + | : Shells ''not'' in the active layer are tinted gray and behave as if they are locked. They can't be re-flattened, packed, cut, welded or edited in any other way. They can be moved, scaled and rotated with the Space-LMB/MMB/RMB actions, but stay put when the Move/Scale/Rotate tools are used. |
| - | ; Pick : Click the gray button to pick all shells in that layer. Click again to unpick the shells. This button also displays the number of shells in that layer. | + | ; Hide : Arm/disarm the second toggle box to show/hide all shells in that layer. |
| - | ; Show : Click the toggle box to show or hide all shells in that layer. | + | ; Name : Set the name of the layer. |
| + | |||
| + | ; Pick : Click the gray button to pick all shells in that layer. Click again to unpick the shells. This button also displays the number of shells in that layer. | ||
| + | |||
| + | : Ctrl-LMB click the gray button to toggle a row showing the number of UV coordinates (vertexes) and polygons in that layer. | ||
| + | |||
| + | ; Lock : The final toggle box is used to completely lock a layer. Shells on this layer will be drawn only in wireframe, and they can't be edited in any way, unless that layer is currently the active layer. | ||
| + | |||
| + | </div> | ||
Current revision
|
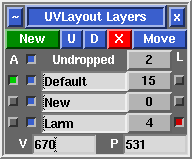
[Professional Version Only] Open up the Layers panel to organize shells into different layers (maximum of 5). Shells in the upper layers will appear over shells in the lower layers where they overlap. Layer assignments are saved into and restored from UVL files, but will be lost when the mesh is exported to an OBJ file.
The top layer is special, and contains all the undropped shells. Every other layer has five widgets:
|
