User Guide: Segment
From UVLayout Docs
(Difference between revisions)
| Revision as of 08:13, 16 February 2012 (edit) Headus (Talk | contribs) ← Previous diff |
Current revision (07:42, 15 June 2021) (edit) (undo) Headus (Talk | contribs) |
||
| (3 intermediate revisions not shown.) | |||
| Line 1: | Line 1: | ||
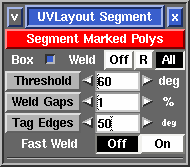
| - | {{:User Guide: Menu}} <div id="pro"> {{Pro3|pro13|User Guide: About UVLayout#pro1}} [[Image:UserGuide-Segment.png|right|]] The '''Segment''' tool is used to speed up the flattening of "hard" surface geometry, that is, non-organic shapes like buildings, furniture and other props. | + | {{:User Guide: Menu}} <div id="pro"><div id="pro13"><div> {{Pro3|pro13|User Guide: About UVLayout#pro1}} [[Image:UserGuide-Segment.png|right|]] The '''Segment''' tool is used to speed up the flattening of "hard" surface geometry, that is, non-organic shapes like buildings, furniture and other props. |
| ; Segment Marked Polys : Click this to detach and drop all marked polys. Each separate object is segmented into a number of shells depending on each poly's surface normal. Polys that are facing in a similar direction are kept together, but when the angle between them is too sharp, they're split apart. | ; Segment Marked Polys : Click this to detach and drop all marked polys. Each separate object is segmented into a number of shells depending on each poly's surface normal. Polys that are facing in a similar direction are kept together, but when the angle between them is too sharp, they're split apart. | ||
| Line 7: | Line 7: | ||
| ; Threshold : This angle determines at which point adjoining polys are split apart. Increasing this angle will result in less fragmentation (i.e. fewer shells), but there will be more distortion in the resulting UVs and extra cuts or darts may need to be added. Reducing this angle will increase the fragmentation, and so more time will need to be spent welding shells back together. | ; Threshold : This angle determines at which point adjoining polys are split apart. Increasing this angle will result in less fragmentation (i.e. fewer shells), but there will be more distortion in the resulting UVs and extra cuts or darts may need to be added. Reducing this angle will increase the fragmentation, and so more time will need to be spent welding shells back together. | ||
| + | |||
| + | : The grey '''Threshold''' button gives you the option to manually segment some or all of your model. Mark one or more faces with the '''G''' hotkey, then click the button and adjacent polys facing the same way, within the threshold, will be filled in. | ||
| ; Weld Gaps : [[Image:UserGuide-Weld-Gaps.png|right|350px]] During the final welding phase, UVLayout checks for any narrow V shaped seams in the UVs, and these are also stitched up. Normally "narrow" means than the gap between the end points is less than '''1%''' of the length of that edge, but you can increase that with this setting. A larger percentage will mean that wider gaps will also be stitched up. | ; Weld Gaps : [[Image:UserGuide-Weld-Gaps.png|right|350px]] During the final welding phase, UVLayout checks for any narrow V shaped seams in the UVs, and these are also stitched up. Normally "narrow" means than the gap between the end points is less than '''1%''' of the length of that edge, but you can increase that with this setting. A larger percentage will mean that wider gaps will also be stitched up. | ||
| : If you are unsure, leave it on 1% for the normal segment processing, then check the final results for any V shaped gaps. If you find some, LMB select those shells, increase the percentage, then click the gray '''Weld Gaps''' button to stitch them up. | : If you are unsure, leave it on 1% for the normal segment processing, then check the final results for any V shaped gaps. If you find some, LMB select those shells, increase the percentage, then click the gray '''Weld Gaps''' button to stitch them up. | ||
| + | |||
| + | ; Tag Edges : Enter in a value and click the '''Tag Edges''' button, or click the arrows, and edges sharper than this angle on visible shells in the '''Edit''' view will be tagged for cutting. | ||
| ; Fast Weld : Normally to weld shells you first tag edges with the '''W''' hotkey, then use '''M''' to bring the shells together, then tap '''Enter'''. When '''Fast Weld''' is turned on, you simply '''LMB''' click an edge then tap '''Enter''' to weld the two shells. | ; Fast Weld : Normally to weld shells you first tag edges with the '''W''' hotkey, then use '''M''' to bring the shells together, then tap '''Enter'''. When '''Fast Weld''' is turned on, you simply '''LMB''' click an edge then tap '''Enter''' to weld the two shells. | ||
Current revision
|
[Professional Version Only] The Segment tool is used to speed up the flattening of "hard" surface geometry, that is, non-organic shapes like buildings, furniture and other props.
|

