User Guide: About UVLayout
From UVLayout Docs
| Revision as of 09:14, 6 November 2023 (edit) Headus (Talk | contribs) ← Previous diff |
Current revision (07:31, 5 November 2025) (edit) (undo) Headus (Talk | contribs) |
||
| (5 intermediate revisions not shown.) | |||
| Line 1: | Line 1: | ||
| __NOTOC__ {{:User Guide: Menu}} UVLayout is a stand-alone application for the creation and editing of UV coordinates for 3D polymeshes and subdivision surfaces. Used by professionals in the games and visual effects industries, by hobbyists of all ilks and by students, UVLayout's unique approach gives texture artists the tools they need to produce high quality low distortion UVs in significantly less time than they would by traditional methods. | __NOTOC__ {{:User Guide: Menu}} UVLayout is a stand-alone application for the creation and editing of UV coordinates for 3D polymeshes and subdivision surfaces. Used by professionals in the games and visual effects industries, by hobbyists of all ilks and by students, UVLayout's unique approach gives texture artists the tools they need to produce high quality low distortion UVs in significantly less time than they would by traditional methods. | ||
| - | Over the following pages the UVLayout GUI will be described, working from the top to the bottom of the main window. Use the menu to the left to move through the various chapters. If you want to jump right into using UVLayout, you should at least read the [[User Guide: Quick Start|Quick Start]] chapter. | + | Over the following pages the UVLayout GUI will be described, working from the top to the bottom of the main window. Use the menu to the left to move through the various chapters. |
| + | |||
| + | If you want to jump right into using UVLayout, you should at least read the [[User Guide: Quick Start|Quick Start]] and [[User Guide: Hotkeys#Main Hotkeys|Main Hotkeys]] chapters. | ||
| '''Note:''' Sections tagged with a {{Pro}} label describe features only available in the Professional version of UVLayout. Click on the {{Pro2|pro0|User_Guide:_Display#pro2}} link to cycle through these sections. | '''Note:''' Sections tagged with a {{Pro}} label describe features only available in the Professional version of UVLayout. Click on the {{Pro2|pro0|User_Guide:_Display#pro2}} link to cycle through these sections. | ||
| Line 55: | Line 57: | ||
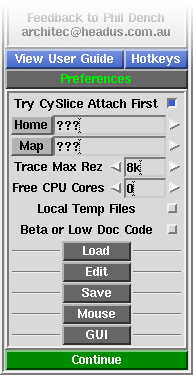
| :; Trace Max Rez : When using the '''Display''' panel's '''Trace''' feature, the map you select is reduced to this size. If you have a modern graphics adapter with a large amount of texture memory, you can probably increase this value to get sharper looking background images. | :; Trace Max Rez : When using the '''Display''' panel's '''Trace''' feature, the map you select is reduced to this size. If you have a modern graphics adapter with a large amount of texture memory, you can probably increase this value to get sharper looking background images. | ||
| - | :; Free CPU Cores : For tools that can utilize multiple CPU cores, this preference tells UVLayout how many CPU cores you want left free for other work you might want to do. Set it to '''0''' and UVLayout will use all cores. | + | :; Max Threads : For tools that can utilize multiple CPU cores, this preference tells UVLayout how many threads to start up for the processing. |
| :; Local Temp Files : When OBJ files are loaded or saved, temporary files are created as the geometry is converted from and to UVLayout's native format. By default these temp files are created in system temporary folders, but if you tick this option, they will be created in the same folder as the file being loaded or saved. If you're experiencing problems loading an OBJ, or saved OBJs are zero sized, turning this on may fix that. | :; Local Temp Files : When OBJ files are loaded or saved, temporary files are created as the geometry is converted from and to UVLayout's native format. By default these temp files are created in system temporary folders, but if you tick this option, they will be created in the same folder as the file being loaded or saved. If you're experiencing problems loading an OBJ, or saved OBJs are zero sized, turning this on may fix that. | ||
| + | |||
| + | :; Beta or Low Doc Code : Enables experimental or undocumented tools. | ||
| === Load Settings === | === Load Settings === | ||
| Line 102: | Line 106: | ||
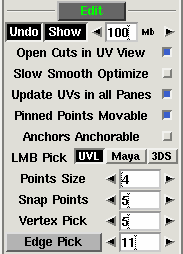
| :::; Points Size : Sets the size in pixels of tagged points. | :::; Points Size : Sets the size in pixels of tagged points. | ||
| - | |||
| - | :::; Snap Points : Sets the distance in pixels for UV point to point snapping. | ||
| :::; Vertex Pick : Sets the number of pixels from a vertex before an edge becomes selectable. | :::; Vertex Pick : Sets the number of pixels from a vertex before an edge becomes selectable. | ||
| :::; Edge Pick : Sets the pixel width of the edge picking region. If you have a mesh loaded and are in the UV view, a rectangle will be drawn along edges as visual feedback while this value is being adjusted. Click the '''Edge Pick''' button to toggle the display of this feedback graphic at all times. | :::; Edge Pick : Sets the pixel width of the edge picking region. If you have a mesh loaded and are in the UV view, a rectangle will be drawn along edges as visual feedback while this value is being adjusted. Click the '''Edge Pick''' button to toggle the display of this feedback graphic at all times. | ||
| + | |||
| + | :::; M / Shift-M : Normally the '''M''' hotkey is used to ''magnetically'' snap shells together before they are welded. Originally '''M''' was used to snap the shell under the cursor away to the location of the adjacent shell, where '''Shift-M''' would move the adjacent shells so they fall alongside the shell under the cursor. This option swaps the action of the '''M''' and '''Shift-M''' hotkeys. | ||
| + | |||
| + | :::; Shift MMB : The original method for moving UV points with the brush was "lossy" in the sense that if you moved the brush to one side then moved the brush back to its original location, the UVs didn't go back to exactly where they were. The new method fixes this. | ||
| + | |||
| + | :::; G / H Select : When using the LMB to select points, polygons or shells, choose between a simple rectangle selection or an editable polygon selection. | ||
| + | |||
| + | :::; A / O Hotkey : With this setting you can decide if the '''A''' hotkey is used for setting anchor points and '''O''' for picking points ('''Orig''') or if you want it the other way around ('''Swap'''). | ||
| === Save Settings === | === Save Settings === | ||
| Line 163: | Line 173: | ||
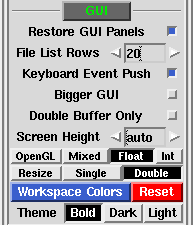
| :::; Bigger GUI : Turn this on to increase the size of the GUI for high resolution displays. ''Linux only''. | :::; Bigger GUI : Turn this on to increase the size of the GUI for high resolution displays. ''Linux only''. | ||
| - | |||
| - | :::; Double Buffer Only : To help speed up some actions, UVLayout will occasionally draw into the front display buffer. On some OS/hardware combinations though, drawing into the front buffer can cause problems. If you notice odd things happening in the display window, then turn this option on. ''On Mac OS X systems, this is on by default, and shouldn't be turned off''. | ||
| :::; Screen Height : When opening up a GUI panel, UVLayout will float it instead if the normal opening would make the main GUI taller than the screen height. On OS X and Linux systems, sometimes the automatic screen height calculation is wrong; here you can set the Screen Height preference to the correct value. | :::; Screen Height : When opening up a GUI panel, UVLayout will float it instead if the normal opening would make the main GUI taller than the screen height. On OS X and Linux systems, sometimes the automatic screen height calculation is wrong; here you can set the Screen Height preference to the correct value. | ||
| Line 176: | Line 184: | ||
| :::; Theme : Choose between the original Bold or Dark or Light color themes for the main GUI panels. | :::; Theme : Choose between the original Bold or Dark or Light color themes for the main GUI panels. | ||
| + | |||
| + | :::; Double Buffer Always : In earlier versions of UVLayout the default was to mix double buffer and direct front buffer drawing. For better performance and compatibility with modern GPUs/drivers, double buffer drawing is now always used and is the default setting. This option to turn it off will likely go away at some point. | ||
| + | |||
| + | :::; Display Speed Boost : Added in v2025.2, the speed boost mode produces quicker redraws for smoother view changes, especially noticeable with dense meshes. You'll only want to turn this off if something isn't drawing properly and you want to go back to the "old slow mode". In that event, please email us a bug report. | ||
| + | |||
| + | :::; FPS Limit : Set the "frames per second" redraw rate here. | ||
| + | |||
| + | :::; Picking Speed Boost : Added in v2025.2, this produces quicker picks (e.g. tagging edges for cuts or welds), and again is particularly better than the old code for dense meshes. This can't be turned off if Display Speed Boost in on. | ||
Current revision
|
UVLayout is a stand-alone application for the creation and editing of UV coordinates for 3D polymeshes and subdivision surfaces. Used by professionals in the games and visual effects industries, by hobbyists of all ilks and by students, UVLayout's unique approach gives texture artists the tools they need to produce high quality low distortion UVs in significantly less time than they would by traditional methods.
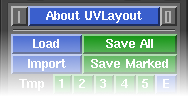
Over the following pages the UVLayout GUI will be described, working from the top to the bottom of the main window. Use the menu to the left to move through the various chapters. If you want to jump right into using UVLayout, you should at least read the Quick Start and Main Hotkeys chapters. Note: Sections tagged with a [Professional Version Only] label describe features only available in the Professional version of UVLayout. Click on the [Professional Version Only] link to cycle through these sections. The top row of the UVLayout main window (see image right) consists of three buttons:
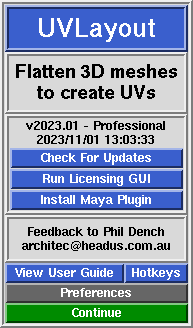
When you click on the About UVLayout button a window (see image right) pops up, showing the version and build date of the UVLayout that you are currently running.
PreferencesClick on the Preferences button to open up the preferences panel. In there are a number of settings you can change that will be remembered next time you run UVLayout.
Load Settings
Edit Settings
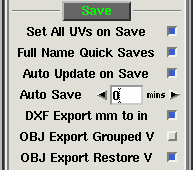
Save Settings
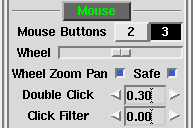
Mouse Settings
GUI Settings
|
