User Guide: Edit
From UVLayout Docs
(Difference between revisions)
| Revision as of 07:29, 1 November 2023 (edit) Headus (Talk | contribs) ← Previous diff |
Current revision (04:11, 3 February 2025) (edit) (undo) Headus (Talk | contribs) |
||
| (5 intermediate revisions not shown.) | |||
| Line 32: | Line 32: | ||
| ; Live : When '''Live''' editing is turned on, each shell's flattening is automatically optimized as cuts and welds are made. With a slow system or particularly complex shell, this may slow down your editing workflow, but you can abort the flattening calculation by aiming the mouse pointer at empty space and then tap either the '''C''' or '''W''' hotkeys. | ; Live : When '''Live''' editing is turned on, each shell's flattening is automatically optimized as cuts and welds are made. With a slow system or particularly complex shell, this may slow down your editing workflow, but you can abort the flattening calculation by aiming the mouse pointer at empty space and then tap either the '''C''' or '''W''' hotkeys. | ||
| + | |||
| + | ---- | ||
| + | |||
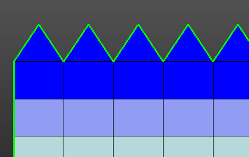
| + | ; Saw Pole : [[Image:UserGuide-Saw-Pole.png|right|]] Used to create saw-tooth style UVs at the poles (end caps) of spheres and similar topology objects. The main body of the object must already have UVs, so you could use the '''R''' hotkey to create them if they don't exist already. Select the end-caps you want new UVs for, next use the '''W''' hotkey to tag all the edges where you want to create the "teeth", then finally click the '''Saw Pole''' button. The '''uv''' value can be set to a specific offset, or leave it at the default of '''0.0''' if you want the offset to equal the depth of the first row of adjacent polys on the main body. | ||
| ---- | ---- | ||
| Line 37: | Line 41: | ||
| ; 4/5/6 Local Scale / Pin : When '''Local Scale''' is selected, the 4/5 hotkeys paint a local scaling into the polys under the brush; this has the effect of moving the UVs in that area in or out during any further flattening, while preserving the shape of the polys as much as possible. | ; 4/5/6 Local Scale / Pin : When '''Local Scale''' is selected, the 4/5 hotkeys paint a local scaling into the polys under the brush; this has the effect of moving the UVs in that area in or out during any further flattening, while preserving the shape of the polys as much as possible. | ||
| - | : When '''Pin''' is selected, the 4/5 hotkeys simply move the UVs in or out directly, disregarding any shape constraints and most likely reducing the quality of the UVs in that area. The UVs are pinned so that any subsequent flattening of that shell doesn't affect the new UV positions. Also when in this '''Pin''' mode, the 6 hotkey can be used to smooth UVs. | + | : When '''Pin''' is selected, the '''4/5''' hotkeys simply move the UVs in or out directly, disregarding any shape constraints and most likely reducing the quality of the UVs in that area. The UVs are pinned so that any subsequent flattening of that shell doesn't affect the new UV positions. Also when in this '''Pin''' mode, the '''6''' hotkey can be used to smooth UVs. |
| ; Smooth Boundary : When smoothing with the 6 hotkey, this option selects whether shell boundaries are modified. | ; Smooth Boundary : When smoothing with the 6 hotkey, this option selects whether shell boundaries are modified. | ||
| Line 47: | Line 51: | ||
| ; Shift-B : This sets how much a shell is scaled up by when using the '''Shift-B''' hotkey. | ; Shift-B : This sets how much a shell is scaled up by when using the '''Shift-B''' hotkey. | ||
| - | ; Strength : Sets the strength of the flattening optimization. Normally you want to leave this at '''1''' for maximum strength/speed, but some people like to slow things down by reducing the strength, and then they can see whats happening and have the opportunity to abort the optimization before it goes too far. | + | ; Strength : Sets the strength of the flattening optimization. Normally this would be at '''1''' for maximum speed. If the strength is reduced, then the flattening optimization is more delicate, which may be desired in certain situations. Also when the strength is reduced, the '''F''' hotkey optimization stops after one step so the results can be assessed before proceeding. |
| ; R Key : This sets what action the '''R''' hotkey performs; '''Rect''' for the newer "Rectangles and Pipes" tool, or '''Relax''' for the old UV relaxing tool, which was long ago replaced with the '''4/5''' hotkeys. | ; R Key : This sets what action the '''R''' hotkey performs; '''Rect''' for the newer "Rectangles and Pipes" tool, or '''Relax''' for the old UV relaxing tool, which was long ago replaced with the '''4/5''' hotkeys. | ||
| Line 65: | Line 69: | ||
| : If no edges are tagged for welding, the '''M''' hotkey will also snap shells together if the mouse pointer is placed over a boundary edge. In this mode, if the '''Pack''' tool bleed is turn on, then a gap of that size is left between the shells. | : If no edges are tagged for welding, the '''M''' hotkey will also snap shells together if the mouse pointer is placed over a boundary edge. In this mode, if the '''Pack''' tool bleed is turn on, then a gap of that size is left between the shells. | ||
| + | |||
| + | ; Junk : Sets the UV tile location for shells thrown into the 'Recycle Bin' with the '''J''' hotkey. | ||
| ---- | ---- | ||
| ; Function Keys : The '''F1''' to '''F6''' function keys can be mapped to buttons in the GUI. Click on one of the '''Fn''' buttons in the GUI, then click on the button in the GUI you want it mapped to. You can then use that function key on the keyboard to perform the mapped action. Buttons that have been previously mapped are colored blue; unmapped buttons are grey. To remove a mapping, double click that '''Fn''' button. To show a reminder of what a mapped button does, hover the mouse pointer over it. | ; Function Keys : The '''F1''' to '''F6''' function keys can be mapped to buttons in the GUI. Click on one of the '''Fn''' buttons in the GUI, then click on the button in the GUI you want it mapped to. You can then use that function key on the keyboard to perform the mapped action. Buttons that have been previously mapped are colored blue; unmapped buttons are grey. To remove a mapping, double click that '''Fn''' button. To show a reminder of what a mapped button does, hover the mouse pointer over it. | ||
Current revision
|
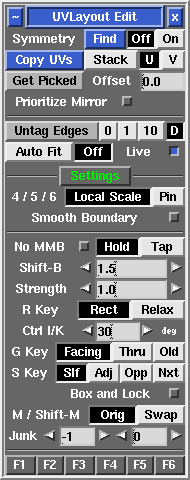
Open up the Edit panel to find a number of general editing tools and settings.
[Professional Version Only]
|


