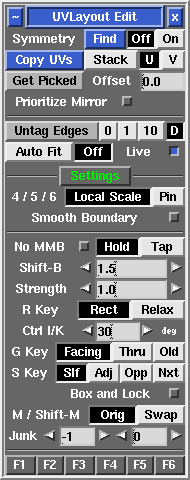
User Guide: Edit
From UVLayout Docs
(Difference between revisions)
| Revision as of 10:13, 15 February 2012 (edit) Headus (Talk | contribs) ← Previous diff |
Revision as of 08:30, 16 February 2012 (edit) (undo) Headus (Talk | contribs) Next diff → |
||
| Line 1: | Line 1: | ||
| {{:User Guide: Menu}} [[Image:UserGuide-Edit.png|right|]] Open up the '''Edit''' panel to find a number of general editing tools and settings. | {{:User Guide: Menu}} [[Image:UserGuide-Edit.png|right|]] Open up the '''Edit''' panel to find a number of general editing tools and settings. | ||
| - | ; Symmetry Find Off/On {{Pro2|pro3|User_Guide:_Edit_Options#pro4}} : If parts of your mesh have mirrored topology, you can use the Symmetry tool to speed up cut'n'weld operations. Click on the '''Find''' button, then LMB click on any edge that sits on the mirror line (i.e. the line that divides the two symmetrical halves), then tap the space bar to continue; if all goes well, the left half of the mesh will be shaded darker than the right, indicating that symmetry editing is now active; non-symmetrical polys are shaded yellow. Cut, weld, detach, attached, drop and undrop actions from then on will be mirrored across to the other half. When packing, symmetrical shells will be arranged to the left and right sides of tiles and boxes. Click on the '''Off''' button if you want to turn the mirroring off. | + | <div id="pro"> {{Pro3|pro3|User_Guide:_Optimize#pro6}} |
| + | ; Symmetry Find Off/On : If parts of your mesh have mirrored topology, you can use the Symmetry tool to speed up cut'n'weld operations. Click on the '''Find''' button, then LMB click on any edge that sits on the mirror line (i.e. the line that divides the two symmetrical halves), then tap the space bar to continue; if all goes well, the left half of the mesh will be shaded darker than the right, indicating that symmetry editing is now active; non-symmetrical polys are shaded yellow. Cut, weld, detach, attached, drop and undrop actions from then on will be mirrored across to the other half. When packing, symmetrical shells will be arranged to the left and right sides of tiles and boxes. Click on the '''Off''' button if you want to turn the mirroring off. | ||
| : If parts of your mesh are symmetrical but detached (e.g. a pair of shoes), first LMB click on any edge in one shell, then MMB click on the mirrored edge in the other shell, then tap the space bar to continue. | : If parts of your mesh are symmetrical but detached (e.g. a pair of shoes), first LMB click on any edge in one shell, then MMB click on the mirrored edge in the other shell, then tap the space bar to continue. | ||
| - | ; Copy UVs Stack/U/V {{Pro2|pro4|User_Guide:_Optimize#pro6}} : To copy UVs between parts of your mesh, first click the '''Copy UVs''' button, then LMB select an edge in the source shell (i.e. the shell you want to copy UVs from); you can select this edge in either the UV or 3D views. This "source" edge will be highlighted in red. | + | ; Copy UVs Stack/U/V : To copy UVs between parts of your mesh, first click the '''Copy UVs''' button, then LMB select an edge in the source shell (i.e. the shell you want to copy UVs from); you can select this edge in either the UV or 3D views. This "source" edge will be highlighted in red. |
| : Next LMB select edges, in the same relative position, for the target shells; by selecting multiple edges, you can copy to more than one shell at a time. If you accidentally select the wrong edge, LMB click on it again to unselect it. All "target" edges are highlighted in blue. | : Next LMB select edges, in the same relative position, for the target shells; by selecting multiple edges, you can copy to more than one shell at a time. If you accidentally select the wrong edge, LMB click on it again to unselect it. All "target" edges are highlighted in blue. | ||
| Line 14: | Line 15: | ||
| : Before copying, select '''Stack''' if the you want the target shells stacked on top of the source shell, or '''U''' or '''V''' if you want them arranged alongside. Stacked shells are locked, but they can be unlocked with the '''L''' hotkey menu after copying. | : Before copying, select '''Stack''' if the you want the target shells stacked on top of the source shell, or '''U''' or '''V''' if you want them arranged alongside. Stacked shells are locked, but they can be unlocked with the '''L''' hotkey menu after copying. | ||
| + | </div> | ||
| ---- | ---- | ||
Revision as of 08:30, 16 February 2012
|
Open up the Edit panel to find a number of general editing tools and settings.
[Professional Version Only]
|
