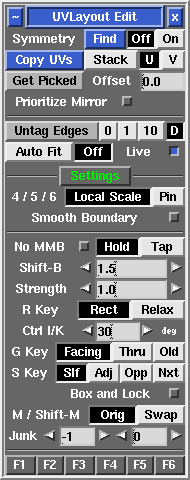
User Guide: Edit
From UVLayout Docs
(Difference between revisions)
| Revision as of 07:01, 9 April 2010 (edit) Headus (Talk | contribs) ← Previous diff |
Revision as of 07:03, 9 April 2010 (edit) (undo) Headus (Talk | contribs) Next diff → |
||
| Line 14: | Line 14: | ||
| : Before copying, select '''Stack''' if the you want the target shells stacked on top of the source shell, or '''U''' or '''V''' if you want them arranged alongside. Stacked shells are locked, but they can be unlocked with the '''L''' hotkey menu after copying. | : Before copying, select '''Stack''' if the you want the target shells stacked on top of the source shell, or '''U''' or '''V''' if you want them arranged alongside. Stacked shells are locked, but they can be unlocked with the '''L''' hotkey menu after copying. | ||
| + | |||
| + | ---- | ||
| ; Untag Edges 0/1/10 : Select the look-ahead range for cut'n'weld tagging of edge loops. Click on the '''Untag Edges''' button to untag all red or yellow highlighted edges. | ; Untag Edges 0/1/10 : Select the look-ahead range for cut'n'weld tagging of edge loops. Click on the '''Untag Edges''' button to untag all red or yellow highlighted edges. | ||
| ; Auto Fit/Off : When '''Auto Fit''' is on, all current UVs are re-normalized (scaled to fit in the 0 to 1 range) every time a UV shell is moved or modified. When '''Off''', they aren't, so you can move shells beyond this range and out onto other tiles. Use the + and _ keys to scale the UV unit box up and down. | ; Auto Fit/Off : When '''Auto Fit''' is on, all current UVs are re-normalized (scaled to fit in the 0 to 1 range) every time a UV shell is moved or modified. When '''Off''', they aren't, so you can move shells beyond this range and out onto other tiles. Use the + and _ keys to scale the UV unit box up and down. | ||
| + | |||
| + | ---- | ||
| ; O/C/N {{Pro2|pro5|User_Guide:_Optimize#pro6}} : When '''O''' is selected the original (pre-v1.9) flattening algorithm is used for all flattening calculations. When '''C''' is selected, a more recent method is used. When '''N''' is selected, the newest method is used; it handles long thin polys better. The older methods are made available in case the newer methods fail for some reason. | ; O/C/N {{Pro2|pro5|User_Guide:_Optimize#pro6}} : When '''O''' is selected the original (pre-v1.9) flattening algorithm is used for all flattening calculations. When '''C''' is selected, a more recent method is used. When '''N''' is selected, the newest method is used; it handles long thin polys better. The older methods are made available in case the newer methods fail for some reason. | ||
| Line 26: | Line 30: | ||
| ; Smooth Boundary : When smoothing UVs using the 6 hotkey, this option determines whether shell boundaries are modified. | ; Smooth Boundary : When smoothing UVs using the 6 hotkey, this option determines whether shell boundaries are modified. | ||
| + | |||
| + | ---- | ||
| ; No MMB : Normally to move UV points around, you hold down {{key|Ctrl}} or {{key|Shift}} and click'n'drag the {{key|MMB}}. If you are doing lots of manual tweaking of UVs, the {{key|MMB}} click'n'drag can be a strain on your mouse hand, so you have the option in that situation to go into '''No MMB''' mode; tick this option, and you can move UVs simply with the {{key|Ctrl}} or {{key|Shift}} keys. If you have '''Hold''' selected, you have to hold down the {{key|Ctrl}} or {{key|Shift}} keys while moving the UVs. Select '''Tap''', and you tap the keys to start moving the UV points, and tap again to release the points. | ; No MMB : Normally to move UV points around, you hold down {{key|Ctrl}} or {{key|Shift}} and click'n'drag the {{key|MMB}}. If you are doing lots of manual tweaking of UVs, the {{key|MMB}} click'n'drag can be a strain on your mouse hand, so you have the option in that situation to go into '''No MMB''' mode; tick this option, and you can move UVs simply with the {{key|Ctrl}} or {{key|Shift}} keys. If you have '''Hold''' selected, you have to hold down the {{key|Ctrl}} or {{key|Shift}} keys while moving the UVs. Select '''Tap''', and you tap the keys to start moving the UV points, and tap again to release the points. | ||
Revision as of 07:03, 9 April 2010
|
Open up the Edit panel to find a number of general editing tools and settings.
|
