From UVLayout Docs
(Difference between revisions)
Revision as of 03:40, 30 April 2009 (edit)
Headus (Talk | contribs)
← Previous diff |
Revision as of 04:21, 30 April 2009 (edit) (undo)
Headus (Talk | contribs)
Next diff → |
| Line 1: |
Line 1: |
| - | {{:User Guide: Menu}} [[Image:UserGuide-Segment.png|right|]] The '''Segment''' tool is used to speed up the flattening of "hard" surface geometry, that is, non-organic shapes like buildings, furniture and other props. | + | {{:User Guide: Menu}} [[Image:UserGuide-Segment.png|right|]] The '''Segment''' tool is used to speed up the flattening of "hard" surface geometry, that is, non-organic shapes like buildings, furniture and other props. {{Pro2|pro12|User Guide: About UVLayout#pro1}} |
| | | | |
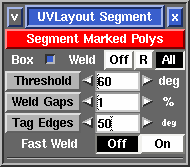
| | ; Segment Marked Polys : Click this to detach and drop all marked polys. Each separate object is segmented into a number of shells depending on each poly's surface normal. Polys that are facing in a similar direction are kept together, but when the angle between them is too sharp, they're split apart. | | ; Segment Marked Polys : Click this to detach and drop all marked polys. Each separate object is segmented into a number of shells depending on each poly's surface normal. Polys that are facing in a similar direction are kept together, but when the angle between them is too sharp, they're split apart. |
Revision as of 04:21, 30 April 2009
|
|
|
|
|
|
The Segment tool is used to speed up the flattening of "hard" surface geometry, that is, non-organic shapes like buildings, furniture and other props. [Professional Version Only]
- Segment Marked Polys
- Click this to detach and drop all marked polys. Each separate object is segmented into a number of shells depending on each poly's surface normal. Polys that are facing in a similar direction are kept together, but when the angle between them is too sharp, they're split apart.
- Box
- Dropped shells are boxed. This makes it easier to move them around as a group.
- Weld
- Shells that form parts of revolved shapes (e.g. pipes, wheels, bolts, balls) are welded back together. For example, cylinders should end up as 3 shells only; the top and bottom caps as one shell each, and all side wall quads as another shell.
- Opt
- Dropped shells are briefly optimized. Further flattening may be required, via the Optimize tool, for more complex shapes.
- Threshold
- This angle determines at which point adjoining polys are split apart. Increasing this angle will result in less fragmentation (i.e. fewer shells), but there will be more distortion in the resulting UVs and extra cuts or darts may need to be added. Reducing this angle will increase the fragmentation, and so more time will need to be spent welding shells back together.
- Fast Weld
- Normally to weld shells you first tag an edge with the W hotkey, then use M to bring the shells together, then tap Enter. When Fast Weld is turned on, you simply LMB click an edge then tap Enter to weld the two shells.
- To help you determine if the selected edge is one you really want to weld, a curve is drawn to the matching edge, and a wire-frame preview of the matching shell is drawn in place. If you want to swap which shell gets moved, use the S hotkey. Red curves indicate that the edges can be welded, a blue curve means you can't weld them (i.e. you can't weld a shell to itself), and no curve means no matching shell can be found (i.e. the adjacent poly hasn't been flattened yet).
|
